Sponsor an Event
This guide walks you, as a prospective sponsor, through the full journey: submitting a sponsorship enquiry, getting it approved by the organizer, paying for your chosen tier, and having your company confirmed as an official sponsor.
The flow has four stages, mirrored by the status on your enquiry:
- Approval Pending – you submitted an enquiry; the organizer is reviewing it.
- Payment Pending – the organizer approved it; you can now pick a tier and pay.
- Paid – your payment succeeded and a sponsor record was created for the event.
- Withdrawn – you (or the organizer) cancelled the enquiry before payment.
You need to be logged in to apply. The enquiry form requires a Buzz account so your enquiry can be tracked under your dashboard.
Step 1 — Submit a sponsorship enquiry
Open the sponsorship application form at /apply-for-sponsorship and start a new enquiry.
This is a standard Buzz web form and requires you to be logged in.
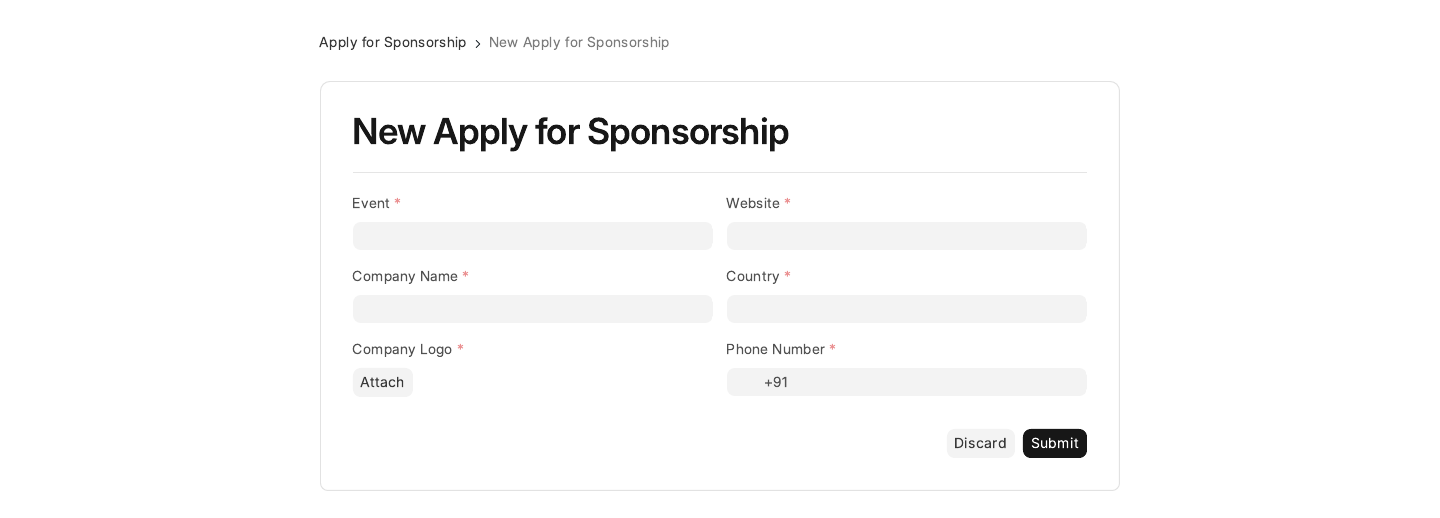
Fill in the required fields:
- Event – the event you want to sponsor (pre-selected when you start from an event page).
- Company Name – your organization's name.
- Company Logo – an image of your logo. You can change this later from your dashboard.
- Website – your company URL.
- Country
- Phone Number
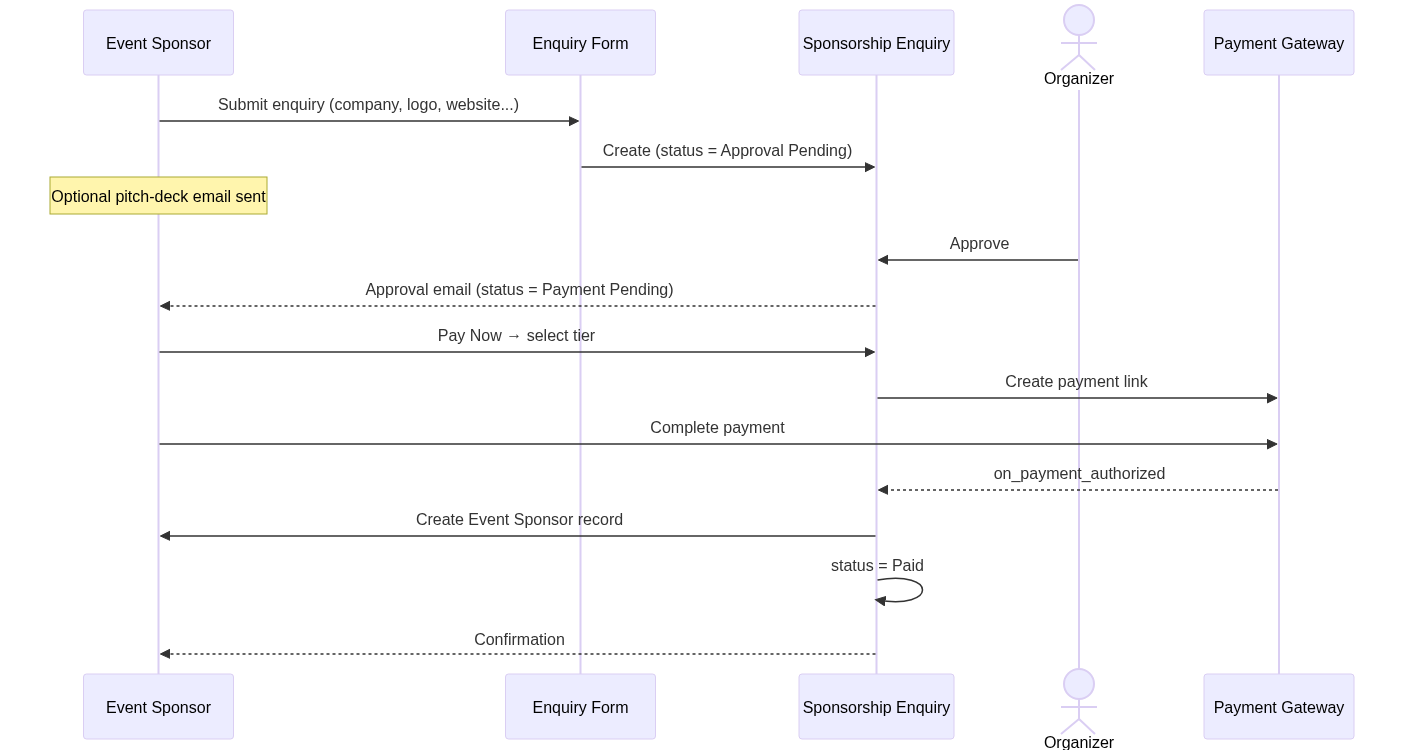
Submit the form. This creates a Sponsorship Enquiry with status Approval Pending.
Pitch deck on submit: If the organizer has enabled it, you'll automatically receive the event's sponsorship pitch deck by email right after submitting. See Sponsorship Tiers and Decks for what that deck contains.
You can review your submitted enquiry any time under
Manage Sponsorships at /b/account/sponsorships.
Step 2 — Wait for organizer approval
While your enquiry is Approval Pending, the event team reviews it. There is nothing more for you to do at this stage — you'll see an "Awaiting Approval" notice on the enquiry detail page.
When the organizer approves your enquiry, its status changes to Payment Pending and you receive an approval email with a link back to your dashboard to complete payment.
Step 3 — Choose a tier and pay
Open the approved enquiry from /b/account/sponsorships. A Payment Pending banner appears
with a Pay Now button.
Clicking Pay Now opens the tier-selection dialog:
- Select a sponsorship tier. Each tier shows its title and price. Tiers are configured by the organizer — see Sponsorship Tiers and Decks.
- Select a payment method (only shown when the event has more than one payment gateway enabled). If a single gateway is configured, it is used automatically.
- Review the Total Amount, then click Proceed to Pay.
You are redirected to the payment gateway to complete the transaction.
Step 4 — Payment confirmation and sponsor record
When your payment is authorized, the system automatically:
- Marks your enquiry as Paid.
- Creates an Event Sponsor record for the event, carrying over your company name, logo, website, country, and chosen tier.
You're redirected back to your enquiry page, which now shows a Payment Successful message and a Sponsorship Confirmed card with your sponsor name, confirmation date, and tier. A confirmation email follows.
Your logo will now appear in the event's sponsor listing for the tier you purchased.
Updating your logo
You can replace your company logo at any time from the enquiry detail page under Company Information → Change Logo / Upload Logo. Only image files are accepted. Updating the logo here keeps the image used for your sponsor placement current.
End-to-end flow
Related
- Manage Sponsorships — track, view, and withdraw your enquiries.
- Sponsorship Tiers and Decks — what tiers and pitch decks the organizer offers.