Store Foundations (Company, Currency & Country)
Before you touch a single product, image, or theme, your store needs a solid financial foundation: which business is selling, which currency you charge in, and which country you operate from. These three answers decide how every price, currency symbol, and order total looks to your shoppers.
The good news: this is standard ERPNext setup, it is usually done once, and on most iVendNext installs it is already filled in for you by the initial setup wizard. This section shows you where those settings live, how to check they are correct, and how to know everything is wired up before you start building your catalog.
Heads-up: The two screens in this section — Company and Global Defaults — are part of ERPNext, the accounting engine underneath your store. They are not iVendNext-specific. We cover only the handful of fields a shop owner needs. For anything deeper (chart of accounts, tax setup, fiscal year), see the official ERPNext documentation: docs.erpnext.com — Company and docs.erpnext.com — Global Defaults.
Before you start
- Complete Section 01 — Welcome & First Login
first. You need to be logged into the admin area (Desk) as an administrator,
and you need to know how to use the search bar at the top (press
Ctrl + GorCmd + G) to jump to any settings screen. This section relies on that search bar — there is no menu button for these pages.
One-time technical setup — ask your administrator. On a brand-new install, your administrator (or the person who set up iVendNext) normally runs the ERPNext setup wizard, which creates your Company record and fills in the currency and country automatically. If you open the screens below and find them empty, stop here and ask your administrator to complete the initial setup — creating a Company from scratch also builds a chart of accounts and tax structure, which is an accounting task, not a shop-owner task. On the demo store used for these screenshots, this is already done (the company is called Lifestyle Demo).
How these settings shape your storefront
flowchart LR
A[Company<br/>Default Currency + Country] --> C{Global Defaults}
B[Global Defaults<br/>Default Company + Currency] --> C
C --> D[Prices & totals<br/>use the right currency]
C --> E[Currency symbol<br/>shows correctly]
C --> F[Every new order<br/>defaults to your company]
D --> G[Storefront<br/>/en]
E --> G
F --> G
Your Company holds the master values. Global Defaults tells the whole system which company and currency to assume when nothing else is specified — including on your storefront. Get these two aligned and every price shopper-side renders in the correct currency, with the correct symbol.
Step 1 — Open your Company and check the basics
- Click the search bar at the top of the screen (or press
Ctrl + G/Cmd + G), type Company, and choose Company from the list. - You will see a list of companies. On a single-store setup there is just one — click its name to open it. In the demo store it is Lifestyle Demo.
- You are now on the Details tab. Check these three fields:
- Default Currency — the currency you sell in (e.g.
INR,USD,AED). This is the currency shoppers will see at checkout. - Country — where your business operates.
- Abbr — a short code for the company (auto-filled). You can leave it as is.
- Default Currency — the currency you sell in (e.g.
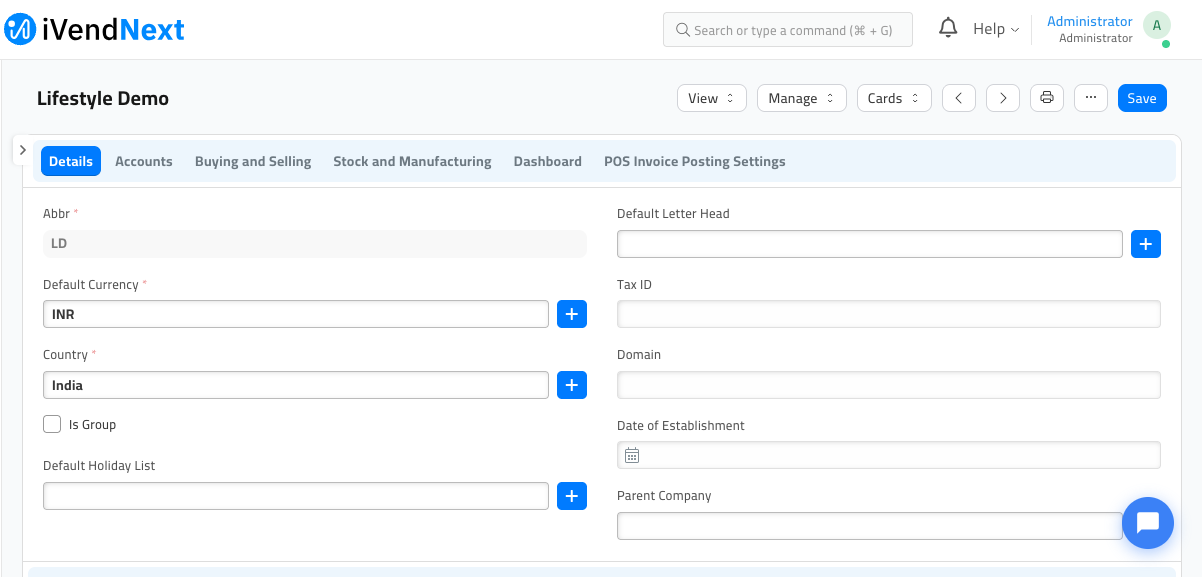
How you know it worked: the Default Currency and Country fields both show a value (they are marked required, with a red asterisk). If either is blank, your administrator needs to complete setup — see the callout above.
You do not normally need to change anything here. If you do edit a field, click the blue Save button at the top-right. Changing the default currency of a live company is an accounting-sensitive action — check with your administrator first.
Step 2 — Confirm your Global Defaults
Global Defaults is the store-wide fallback. When the system needs to know "which company?" or "which currency?" and nothing more specific is set, it uses these values — so they must match your Company.
- Click the search bar again, type Global Defaults, and open it.
- Check these fields:
- Default Company — should be your company (here, Lifestyle Demo). This is the company every new order and invoice is created against.
- Default Currency — should match the currency on your Company.
- Country — should match your Company's country.
- Leave Hide Currency Symbol on its default (blank) — or set it to No — so shoppers see a proper symbol (like ₹, $ or AED) next to prices. Leave the other fields at their defaults.
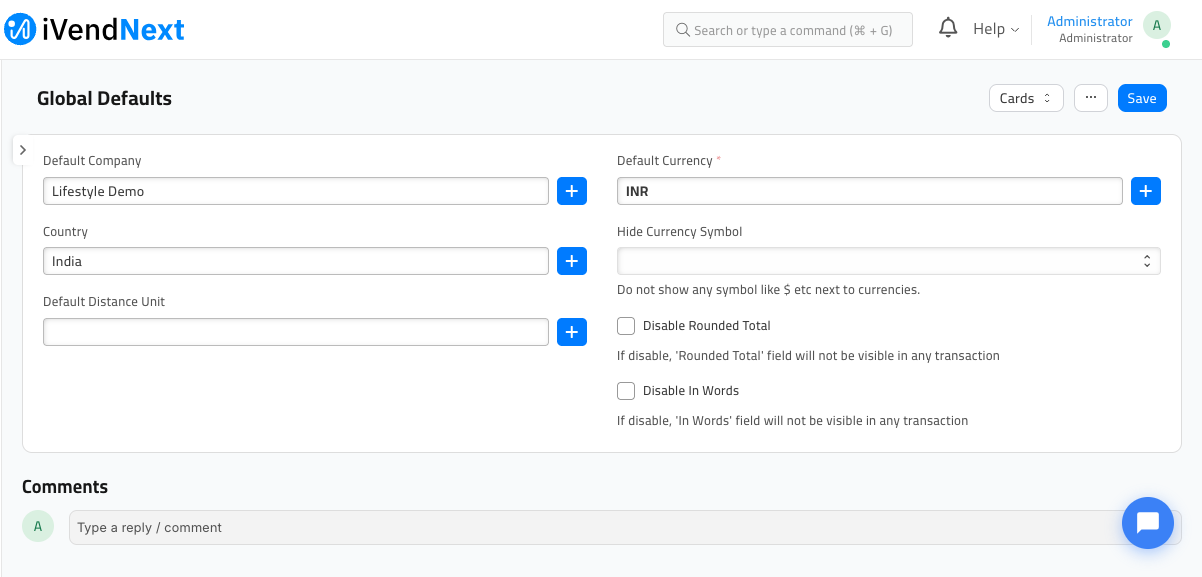
How you know it worked: Default Company and Default Currency both show the same values you saw on the Company screen. If you changed anything, click Save at the top-right; a "Saved" confirmation appears briefly.
Step 3 — Verify it on the storefront (optional but reassuring)
You will not have products to look at yet — that comes later — but once your
catalog exists you can open your live storefront at /en and confirm that
every price shows in the currency and symbol you set here. If a price ever
appears in the wrong currency, this is the first place to come back and check.
Note: iVendNext also asks you to select your company again inside the store's own control panel — the Lifestyle Settings page — so the storefront knows which company to sell as. That is covered in Section 03 — eCommerce Settings Hub. The Company and Global Defaults you confirmed here are the values it links to.
What you have accomplished
- Confirmed your Company exists with the correct currency and country.
- Confirmed Global Defaults points at that same company and currency.
- Your store now has a correct financial foundation, so prices, currency symbols, and totals will render correctly everywhere.
Next: Section 03 — eCommerce Settings Hub (Lifestyle Settings), where you set your store name, logo, and connect this company to the storefront.