Bulk Product & Image Tools
Adding products one at a time is fine for a handful of items — but when you're stocking a whole store, doing everything by hand is slow. iVendNext gives you a small set of bulk tools that handle the repetitive jobs in one go:
- Bulk Image Upload — drop a folder of photos and have them attached to the right colour variants automatically.
- Bulk Publish / Unpublish Variants — switch a whole group of products on or off the storefront at once.
- Create Configurators for All Templates — turn every variant-ready product into a working colour/size product in a single click.
- Install Demo Data — fill a brand-new, empty store with sample products so you can see how everything fits together.
- Publish All Items to Website — push everything live in one step.
This section explains what each tool does, when to reach for it, and how to know it worked.
Where these live: the first two tools are their own screens, reached from the Desk search bar (press Ctrl/Cmd + G). The last three are actions inside Lifestyle Settings → Bulk Actions / Import. See 01 · Welcome & First Login for a refresher on the search bar.
Before you start (prerequisites)
- 08 · Add Your First Products — you should already have some products in your catalogue. Bulk tools speed up work on products that exist; they don't replace creating them.
- 09 · Products with Variants — the image upload and publish/unpublish tools work on colour variants (Style Attribute Variants). If your products don't have variants yet, set them up first.
- 03 · eCommerce Settings Hub — the Install Demo Data and Publish All Items to Website buttons live on the Bulk Actions / Import tab of Lifestyle Settings.
Which tool for which job?
Use this map to pick the right tool for what you're trying to do.
flowchart TD
    Q{"What do you<br/>need to do?"}
    Q -->|"Add many product photos<br/>at once"| A["Bulk Image Upload<br/>(upload a ZIP of folders)"]
    Q -->|"Show or hide a whole<br/>group of products"| B["Bulk Publish /<br/>Unpublish Variants"]
    Q -->|"Turn every variant product<br/>into a live colour/size product"| C["Create Configurators<br/>for All Templates"]
    Q -->|"Fill an empty test store<br/>with sample products"| D["Install Demo Data"]
    Q -->|"Push everything live<br/>in one step"| E["Publish All Items<br/>to Website"]
Tool 1 · Bulk Image Upload
Instead of opening each colour variant and attaching photos one by one, you can hand the store one ZIP file containing all your photos, arranged into folders. The store reads the folder names, finds the matching product variant, and attaches every image inside.
Step 1 · Arrange your photos into folders
Inside the ZIP, use two levels of folders: the outer folder is the product (style) name, and the folder inside it is the colour name. The photos go in the colour folder.
my-photos.zip
├── Loose Fit Hoodie/        ← product (style) name
│   ├── White/               ← colour name
│   │   ├── front.jpg
│   │   └── back.jpg
│   └── Black/
│       ├── front.jpg
│       └── side.jpg
└── Cotton T-Shirt/
    └── Blue/
        └── main.jpg
The names matter: the outer folder must match the product's style name and the inner folder must match the colour exactly as they're spelled on your variant products. Supported photo types are .jpg, .jpeg, .png and .webp.
Step 2 · Open the Bulk Image Upload screen
- Press Ctrl/Cmd + G, type Bulk Image Upload, and open it.
- Click + Add Bulk Image Upload to start a new one.

Notice the on-screen hint — "Format: Folder.zip > Style Name > Color Name > Images" — it's the same folder layout described in Step 1.
Step 3 · Attach the ZIP and choose how to handle existing photos
- Next to Folder ZIP, click Attach and select your
.zipfile. - Decide on Replace Existing?:
- Ticked (the default) — the tool clears each variant's current photos first, then adds the ones from your ZIP. Use this when you want the ZIP to become the complete new set of photos.
- Unticked — the new photos are added alongside whatever photos the variant already has.
- Click Save.
Step 4 · Start the import
After saving, a yellow note appears: "Submit document to start import." Click Submit (the tick/submit action at the top of the form) to run the upload.
How you know it worked: the store creates a Bulk Image Upload Log for the run, with one line per colour variant showing how many images were attached. Open any variant afterwards (see 09 · Products with Variants) and you'll see the new photos in its Images table.
If a colour didn't get its photos: the folder name almost certainly doesn't match a variant. Check that the outer folder equals the product's style name and the inner folder equals the colour name, exactly as spelled on the variant. Fix the folder name, re-zip, and upload again.
Tool 2 · Bulk Publish / Unpublish Variants
This tool flips the published switch on many colour variants at once — handy for putting a whole brand on sale, hiding a discontinued line, or launching a seasonal range together.
Step 1 · Open the screen
Press Ctrl/Cmd + G, type Bulk Publish Variants, and open it.
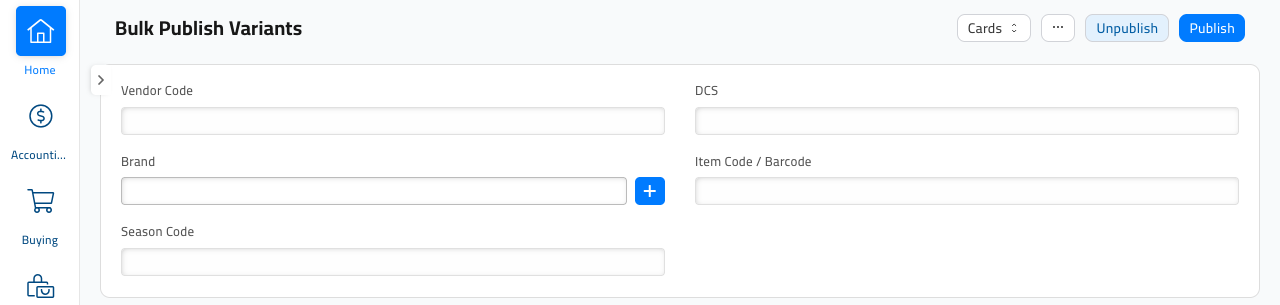
Step 2 · Narrow down which products to affect
Fill in at least one filter so the tool knows which products you mean. The most useful, always-available filters are:
- Brand — every variant of a chosen brand.
- Item Code / Barcode — a specific product.
How you know your filter is right: you don't have to guess — the result message (Step 3) tells you exactly how many variants matched.
About the other filters (Vendor Code, DCS, Season Code). These are for stores that tag products with supplier or season codes. They only work if your store actually tracks those codes on its products — on a standard store the Vendor Code and DCS filters aren't available and will report an error, so stick to Brand or Item Code unless you know those codes are in use.
Step 3 · Publish or unpublish
- Click Publish to put the matching products on the storefront, or Unpublish to take them off.
- Confirm when asked.
How you know it worked: a message tells you how many variants were changed and how many matched your filter — for example "Successfully published 3 variants, matched 3 variants." A "matched 0" result means nothing fit your filter (check the spelling of the brand or item code and try again).
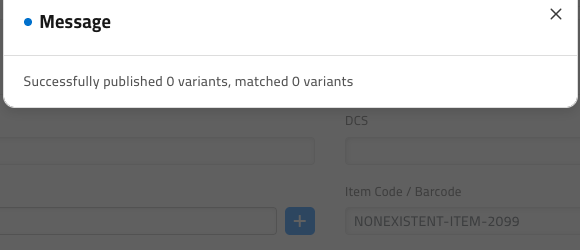
Publishing a variant still needs it to have images. If a variant has no photos, publishing won't put it live — add photos first (Tool 1 is the fast way).
Tool 3 · Create Configurators for All Templates
When you have lots of variant-ready products (products marked "Has Variants" in ERPNext), setting up a Style Attribute Configurator for each one by hand — as you did in 09 · Products with Variants — is tedious. This tool does them all at once.
- Open Lifestyle Settings (press Ctrl/Cmd + G, type Lifestyle Settings) and click the Bulk Actions / Import tab.
- In Based on Attribute, choose the option that separates the colours (usually Colour).
- Click Publish Variants for All Templates.
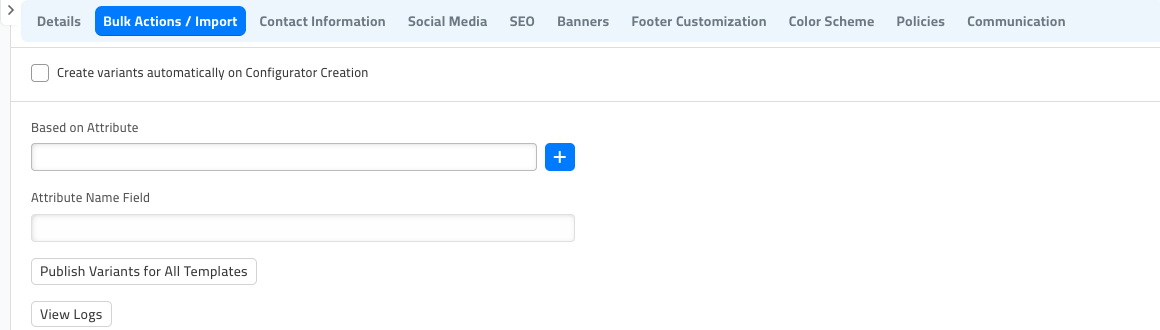
The store works through every variant-ready product that doesn't already have a configurator, creates one, and generates its colour variants — running in the background so you can keep working.
How you know it worked: you'll see a "Creating configurators. View Log" message. Click View Logs (or the link in the message) to open the log, which lists each product it processed and how many variants it created.
Products that already have a configurator are skipped, so it's safe to run this again after adding new variant products — it only fills in the ones that are missing.
Tool 4 · Install Demo Data
For a brand-new, empty store only
Install Demo Data fills the store with sample products, brands, price lists, a shipping rule and a warehouse so you can explore a working shop before building your own catalogue. Use it on a fresh, empty store — not on a store that already has your real products, because it adds sample records you'll then have to clean up. It also does not choose or switch on a theme for you; you still do that in 04 · Choose & Activate Your Storefront Theme.
- Open Lifestyle Settings → Bulk Actions / Import tab and scroll to Demo Data & Testing.

- Click Install Demo Data and confirm.
How you know it worked: a message confirms the job has been queued — "Demo data installation has been queued. This may take a few minutes." It runs in the background; after a couple of minutes you'll find new sample brands, price lists and products in your catalogue, ready to view on the storefront.
Tool 5 · Publish All Items to Website
Once your products are ready, this button pushes everything live at once and tidies up each product's web address — a one-click alternative to publishing products individually.
- On Lifestyle Settings → Bulk Actions / Import → Demo Data & Testing, click Publish All Items to Website.
- Confirm.
How you know it worked: a message confirms the job started — "Publishing all items to website. This may take a moment. Refresh the page after completion." Refresh the page after a moment, then open your storefront (/en) to see the products live.
You'll use this same button again as the final step when you open for business — see section 17 · Preview & Go Live.
Putting it together
A common order when filling a new store quickly is:
flowchart LR
    A["Create variant products<br/>(section 09)"] --> B["Create Configurators<br/>for All Templates<br/>(Tool 3)"]
    B --> C["Bulk Image Upload<br/>attach all photos<br/>(Tool 1)"]
    C --> D["Bulk Publish Variants<br/>switch them on<br/>(Tool 2)"]
    D --> E["Publish All Items<br/>to Website<br/>(Tool 5)"]
    E --> F["Products live on<br/>the storefront"]
Quick recap
- Bulk Image Upload — a ZIP of
Style Name / Colour Name / photosattaches all product images in one go; Replace Existing? decides whether new photos replace or add to the old ones. - Bulk Publish / Unpublish Variants — filter by Brand or Item Code, then Publish or Unpublish; the result message tells you how many matched.
- Create Configurators for All Templates — sets up variants for every variant-ready product at once; View Logs shows what it did.
- Install Demo Data — sample catalogue for a fresh, empty store; does not pick a theme.
- Publish All Items to Website — one click to push everything live.
With a full catalogue in place, continue to 11 · Set Up Payments to start taking money at checkout.