Add Your First Products
A product is anything you sell — a t‑shirt, a scarf, a pair of sunglasses. In iVendNext, each product is stored as an Item: one record that holds the product's name, its category, its price, a description and its pictures. Once an Item exists and is published, shoppers can find it, open its page and add it to their cart.
This section walks you through creating your very first product by hand, so you understand every field. (When you're ready to add many products at once, 10 · Bulk Product & Image Tools shows the fast way.)
Where it lives: Open it from the Desk search bar (press Ctrl/Cmd + G), type Item, and pick it from the list. There is no menu icon for products — search is how you reach them. See 01 · Welcome & First Login for a refresher on the search bar.
Before you start (prerequisites)
- 07 · Organize Your Catalog (Categories) — you'll file each product under a category as you create it, so your categories should already exist.
- 03 · Your eCommerce Settings Hub — your default price list and eCommerce warehouse are selected in Lifestyle Settings. These tell the store which price to show and where stock is counted. (Setting the price list and shipping in full is covered in 12 · Shipping, Taxes & Pricing.)
- 04 · Choose & Activate Your Storefront Theme — a theme must be active for your product to have a storefront to appear on.
- You are logged in to the admin (Desk) as described in 01 · Welcome & First Login.
How the pieces fit together
A product isn't a single thing — it's a small record connected to a few others. The category comes from your catalog, the price comes from your price list, and the storefront reads all of it to build the product's page.
flowchart LR
    C[Category<br/>from section 07] --> I[Item<br/>name · description · image]
    P[Price list<br/>from section 03 / 12] --> I
    I --> V[Publish to storefront<br/>variants · Publish All Items]
    V --> L[Product listing<br/>/en/products]
    V --> D[Product page<br/>/en/products/your-product]
Important — how a product becomes visible on the storefront
Unlike some stores, there is no single "Publish" checkbox on the Item here. Creating and saving an Item gives you the product record; making it appear on the storefront happens in a separate step:
- For clothing‑style stores, products go live through the variant / swatch setup in 09 · Products with Variants (this is what creates the shopper‑facing product page with its sizes and colours).
- To push a batch of finished products live in one click, use the Publish All Items to Website button in Lifestyle Settings — see 10 · Bulk Product & Image Tools and 17 · Preview & Go Live.
So: build the Item here first, then publish it in 09/10. This section gets the product record right; the next one puts it in the window.
Step 1 · Open your product list
- Press Ctrl/Cmd + G to open the search bar.
- Type Item and choose it from the results.
You land on the list of every product in your store. Each row shows the product's Item Name, its Status (Enabled), its Item Group (the category) and its ID.
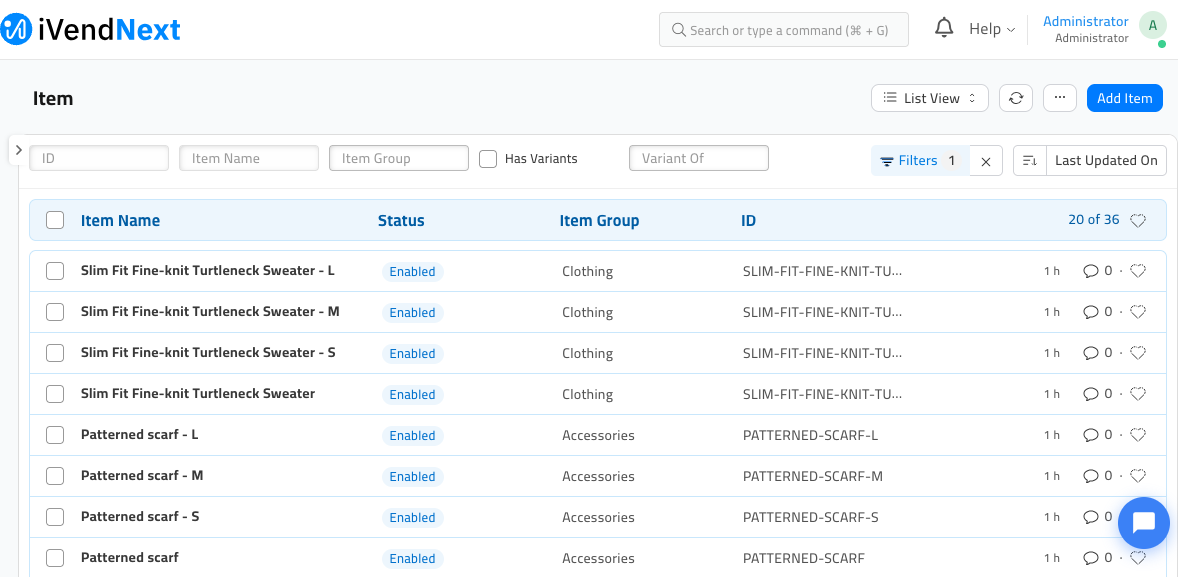
The screenshot above shows a store that already has demo products, for illustration. On a brand‑new store this list is empty and shows a "You haven't created a Item yet" message instead — that's normal before you add your first one.
How you know it worked: you see the Item heading and a blue Add Item button at the top right.
Step 2 · Start a new product
Click the blue Add Item button at the top right. A blank new‑product form opens with the Details tab showing.
How you know it worked: the page title reads New Item with an orange Not Saved marker, and you see empty fields for Item Code, Item Name and so on.
Step 3 · Name your product
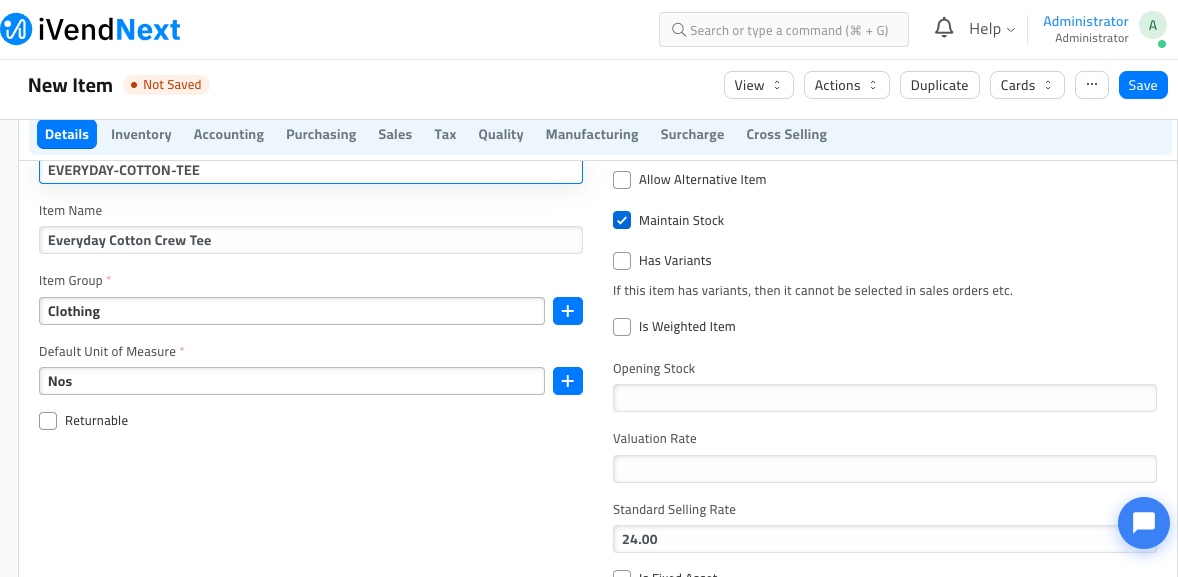
- In Item Code, type a short unique code for the product, e.g.
EVERYDAY-COTTON-TEE. This is the internal reference; it doesn't have to be pretty. - In Item Name, type the name shoppers will see, e.g.
Everyday Cotton Crew Tee.
Keep the Item Code short and without spaces — it's used behind the scenes. The Item Name is the friendly label that appears on the storefront.
Step 4 · Put it in a category
In Item Group, pick the category this product belongs to (for example Clothing). This is the same category tree you built in 07 · Organize Your Catalog, and it decides where the product shows up when shoppers browse and filter.
How you know it worked: the category name appears in the Item Group box. If the category you want isn't there, create it first in section 07.
Leave Default Unit of Measure as Nos (short for "numbers", i.e. sold as individual pieces) unless you sell by weight or length.
Step 5 · Set the selling price
In Standard Selling Rate, type the price you want to charge, e.g. 24.00. This becomes the product's price in your default price list.
How you know it worked: the amount shows in the Standard Selling Rate box.
Two ways to price a product. Typing a Standard Selling Rate here is the quick way. For sale prices, multiple price lists or tax‑inclusive pricing, you manage prices in the price lists themselves — see 12 · Shipping, Taxes & Pricing. Whichever you use, the storefront shows the price from the default price list you selected in 03 · Your eCommerce Settings Hub.
Step 6 · Describe the product
Scroll down to the Description box and write a short, appealing description — fabric, fit, what makes it nice. This text appears on the product's storefront page and helps shoppers (and search engines) understand what they're buying.
How you know it worked: your text stays in the Description box as you type.
Step 7 · Add product pictures
Good photos sell. Scroll to the Image field and upload the product's main picture:
- Click the Image field (labelled Attach Image).
- Choose Upload and pick a photo from your computer, or drag one in.
Use a clear, well‑lit photo, ideally square, so it sits neatly in the product grid.
How you know it worked: a thumbnail of your photo appears in the Image field.
This first image is the product's headline photo. Additional gallery photos (like the extra angles you see on a live product page) are added alongside the colour/size setup in 09 · Products with Variants, and you can upload many at once with 10 · Bulk Product & Image Tools.
Step 8 · Confirm it's sellable, then save
- Make sure Allow Sales is ticked (it's on by default) — this lets the product be sold and appear in carts and orders.
- Click the blue Save button at the top right (or press Ctrl/Cmd + S).
How you know it worked: a green Saved message flashes, the orange Not Saved marker disappears, and the page title changes from New Item to your product's code. Your product now exists as a record.
Step 9 · Publish it to the storefront
Saving the Item creates the record, but shoppers can't see it yet. Publish it using one of the paths described in the callout above:
- Set up its colours and sizes in 09 · Products with Variants (recommended for clothing — this is what builds the shopper‑facing page), or
- Push all your finished products live at once with the Publish All Items to Website button — see 10 · Bulk Product & Image Tools.
How you know it worked: the product appears on your storefront — check it in the next step.
Step 10 · See it live on your store
Open your storefront to confirm the product is really there.
- In a new browser tab, go to your store's product list:
/en/products(for this store,http://ivend-docs.localhost:8000/en/products). - You should see your products laid out in a grid, with the category filters (Men, Women, Clothing, and so on) down the left — the same categories from section 07.
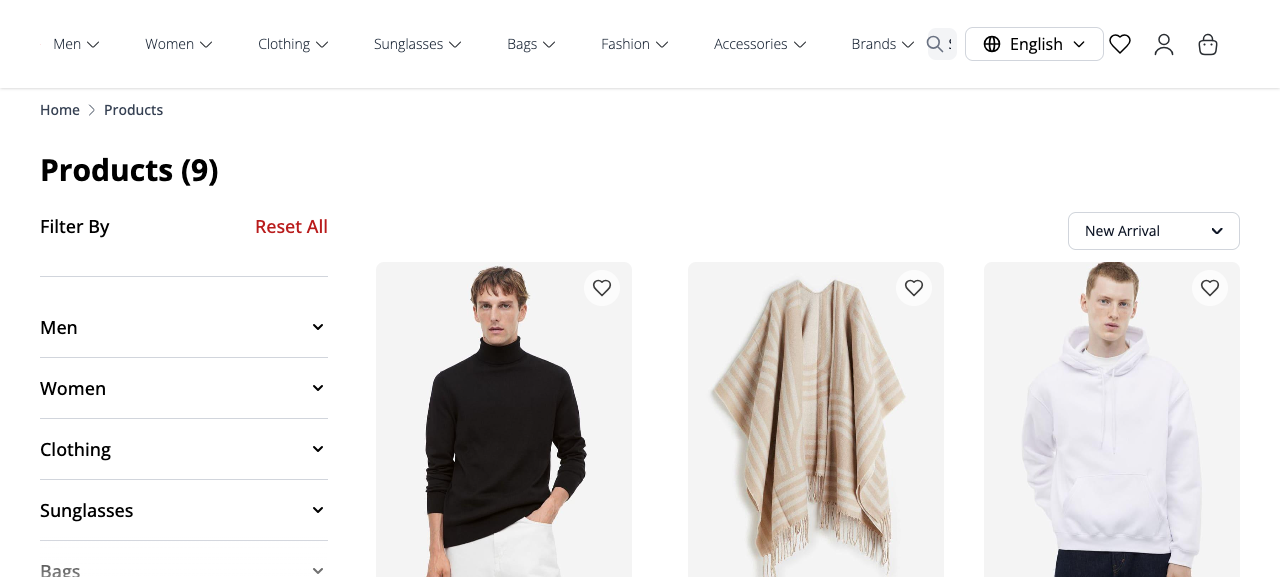
This listing and the product page below use the store's demo catalog for illustration. Right after adding just one product, you'll instead see Products (1) and your own Everyday Cotton Crew Tee, not this grid.
Click any product to open its own page. Here shoppers see the large photo, the picture gallery, the breadcrumb trail showing which category it's in, and the add‑to‑cart controls.
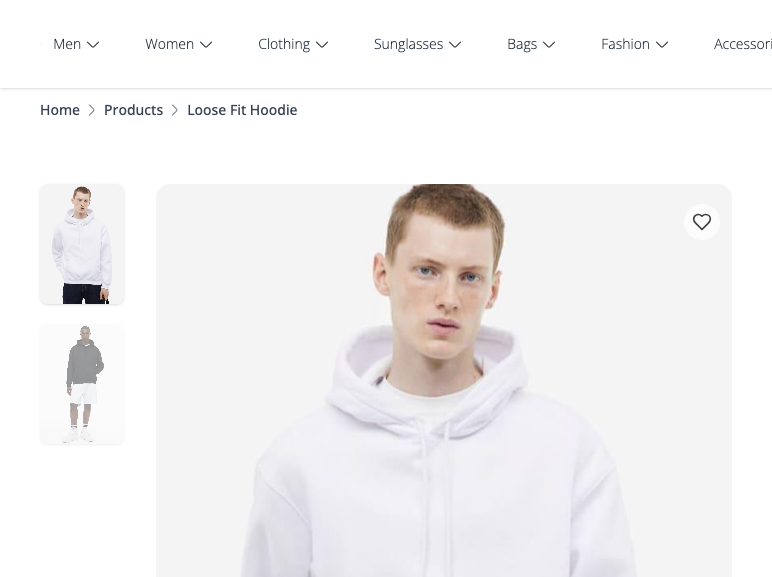
How you know it worked: your product shows up in the grid at /en/products, and clicking it opens a page with its photo, name and category breadcrumb.
Where this fits in the bigger picture
Your first product record is done. From here the catalog grows and gets richer:
flowchart TD
    A[07 · Categories] --> B[08 · Create the product<br/>name · category · price · image]
    B --> C[09 · Variants<br/>sizes · colours · swatches<br/>→ makes it shopper‑ready]
    B --> D[10 · Bulk tools<br/>many products & images at once]
    C --> E[17 · Preview & Go Live<br/>Publish All Items]
    D --> E
Next, add the sizes, colours and swatches that turn a plain product into a fully shoppable one in 09 · Products with Variants.
Quick recap
- Search for Item (Ctrl/Cmd + G) and click Add Item.
- Give it an Item Code and a shopper‑friendly Item Name.
- Choose its Item Group (category) from section 07.
- Set the Standard Selling Rate (price).
- Add a Description and upload an Image.
- Confirm Allow Sales is ticked and Save.
- Publish it (via 09 · Variants or Publish All Items), then check it at
/en/products.