Footer, Navigation & Store Info Pages
The footer is the strip at the very bottom of every storefront page. It holds your newsletter sign‑up, your quick‑link columns (Help, About Us, and so on), your contact details, your social‑media icons, and your copyright line. This section also covers two store‑information pages shoppers can reach from the footer: your Contact Us page and your Find Store page.
Everything here is edited in one place you already know — the Lifestyle Settings page — across three tabs: Footer Customization, Contact Information, and Social Media. The Find Store page is the one exception: its store list comes from Shop address records, which you'll add near the end.
Where it lives: Open the Desk search bar (press Ctrl/Cmd + G), type Lifestyle Settings, and pick it from the list. See 03 · Your eCommerce Settings Hub for a refresher on this page and its tabs.
Before you start (prerequisites)
- 04 · Choose & Activate Your Theme — a storefront theme must be active, otherwise there is no footer or store pages to show your settings on.
- 03 · Your eCommerce Settings Hub — you should already be comfortable opening Lifestyle Settings and switching between its tabs, and know how to press the blue Save button.
You do not need any products or categories in place to do this section — the footer and store pages work on an empty catalog.
How the footer is built
Your footer is assembled from a few independent pieces, each coming from a different tab. Here's the map, so you know which tab to open for which part of the footer:
flowchart LR
    subgraph LS["Lifestyle Settings tabs"]
        FC["Footer Customization tab<br/>newsletter · link columns · copyright"]
        CI["Contact Information tab<br/>phone · email · hours · address"]
        SM["Social Media tab<br/>Facebook · Instagram · TikTok · X"]
    end
    subgraph SHOP["Shop address records"]
        ADDR["Address (type = Shop)"]
    end

    FC --> FOOTER["Storefront footer<br/>(bottom of every page)"]
    CI --> FOOTER
    CI --> CONTACT["Contact Us page<br/>/en/contact-us"]
    SM --> FOOTER
    ADDR --> FINDSTORE["Find Store page<br/>/en/find-store"]
Work through the tabs top to bottom, save once at the end of each tab, then check the live storefront. Let's go.
Step 1 · Open the Footer Customization tab
On the Lifestyle Settings page, click the Footer Customization tab. The top of the tab holds your newsletter block.
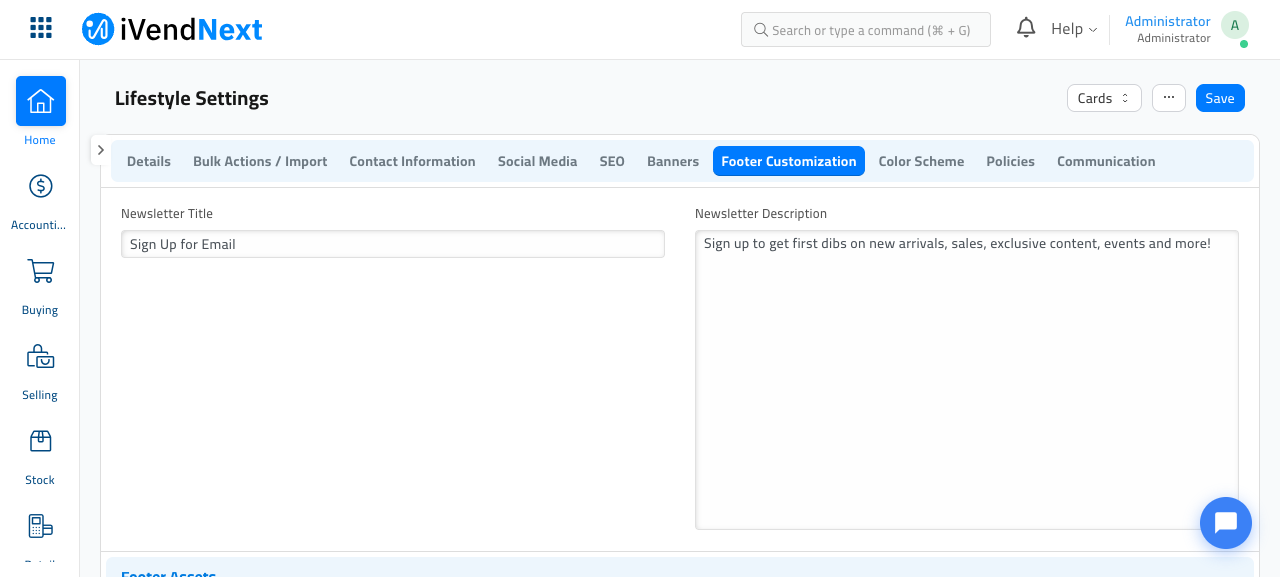
- Newsletter Title — the heading above the email sign‑up box in the footer. For example Sign Up for Email.
- Newsletter Description — the short line of encouraging text under the heading, for example Sign up to get first dibs on new arrivals, sales, exclusive content, events and more!
How you know it worked: the text stays in each box and a small unsaved‑changes dot appears next to the page title. You'll save at the end of the tab.
Step 2 · Set your copyright line
Scroll down to the Copyright & Legal section.
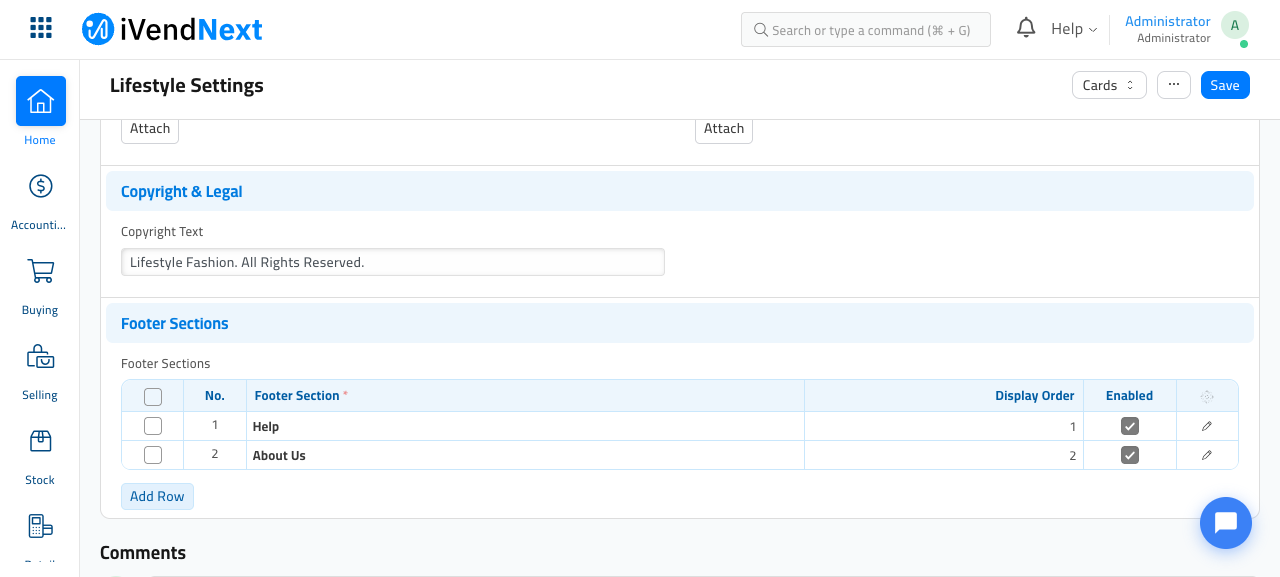
- In Copyright Text, type the name that should appear after the © symbol at the very bottom of the page, for example Lifestyle Fashion. All Rights Reserved.
How you know it worked: on the live footer this will read © 2026 Lifestyle Fashion. All Rights Reserved. — the store adds the current year for you automatically.
The Footer Assets section just above (Payment Methods Image and VAT Certificate Image) is optional. Leave it empty unless you have a specific image of accepted payment logos or a tax certificate to display; the theme already shows standard card logos.
Step 3 · Build your footer link columns
The Footer Sections table (see the screenshot above) is where you add the tidy columns of links shoppers see in the footer — things like Help or About Us. Each column is a reusable Footer Section record that holds a title and its list of links.
3a · Create a footer section with its links
- Open the Desk search bar (Ctrl/Cmd + G), type Footer Section Config, and press Enter. Click + Add Footer Section Config (or open an existing one to edit it).
- Give it a title (the column heading, e.g. Help).
- In the Links table, click Add Row for each link and fill in:
- Link Label — the words shoppers click, e.g. Privacy Policy.
- Link URL — where it goes, e.g.
/en/privacy-policy. - Display Order — a number that sets top‑to‑bottom order (1, 2, 3…).
- Enabled — tick to show the link; untick to hide it without deleting it.
- Make sure the Enabled box near the top of the record is ticked, then click Save.
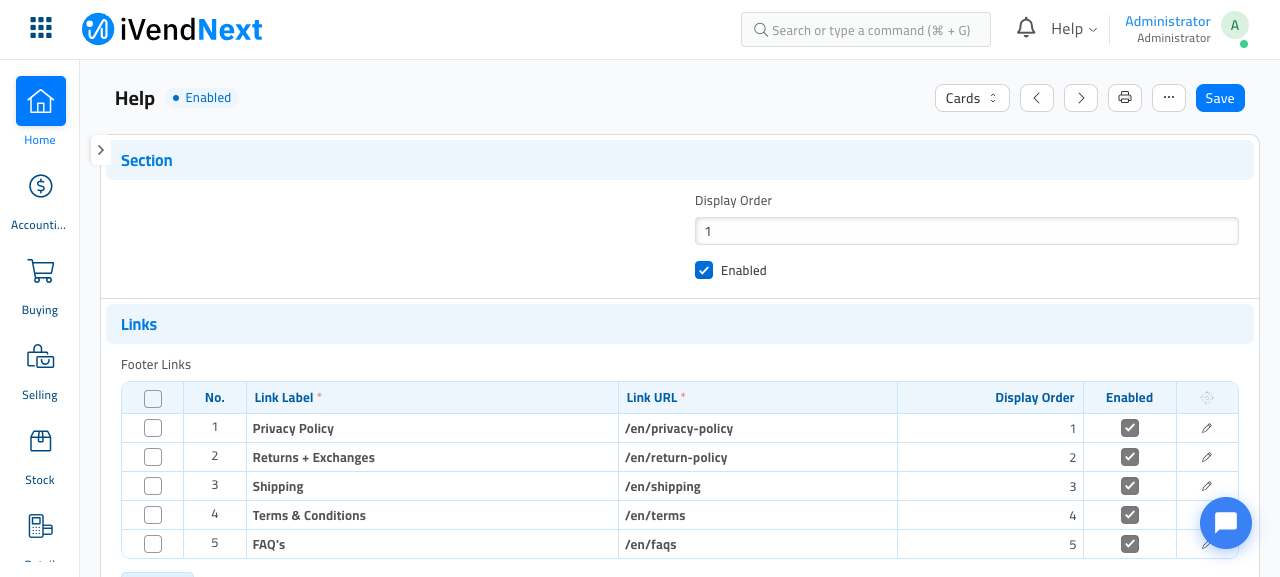
How you know it worked: the record shows a green Enabled dot near the title and your links are listed in the table.
3b · Add the section to your footer
- Go back to Lifestyle Settings → Footer Customization tab → Footer Sections table.
- Click Add Row. In Footer Section, pick the section you just created (e.g. Help).
- Set its Display Order (columns run left to right) and tick Enabled.
- Repeat for each column you want (for example a second About Us column).
How you know it worked: each column appears as a row in the Footer Sections table with a ticked Enabled box, as in the two‑row example above.
Click the blue Save button (or Ctrl/Cmd + S) now to save the whole Footer Customization tab. A green Saved message flashes at the top.
Step 4 · Fill in your contact details
Click the Contact Information tab. These details appear in the footer's Contact us column and on your Contact Us page.
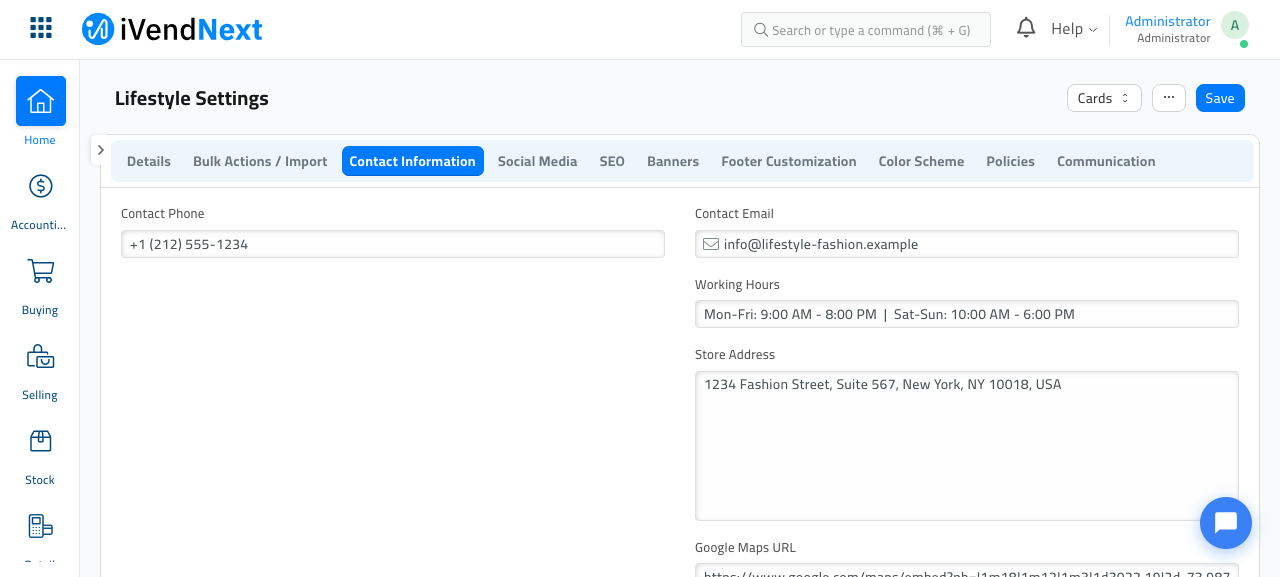
- Contact Phone — your shop's phone number. It becomes a tap‑to‑call link on mobile.
- Contact Email — your customer‑service email. It becomes a click‑to‑email link.
- Working Hours — free text, e.g. Mon–Fri: 9:00 AM – 8:00 PM | Sat–Sun: 10:00 AM – 6:00 PM.
- Store Address — your main postal address, shown in the footer and on the Contact page.
- Google Maps URL — optional. Paste a Google Maps embed link here to show a map on your Contact page.
Contact Subjects
Scroll down to the Contact Subjects table. These are the choices in the Subject drop‑down on your Contact Us form, so you can route enquiries (orders, returns, wholesale, and so on).
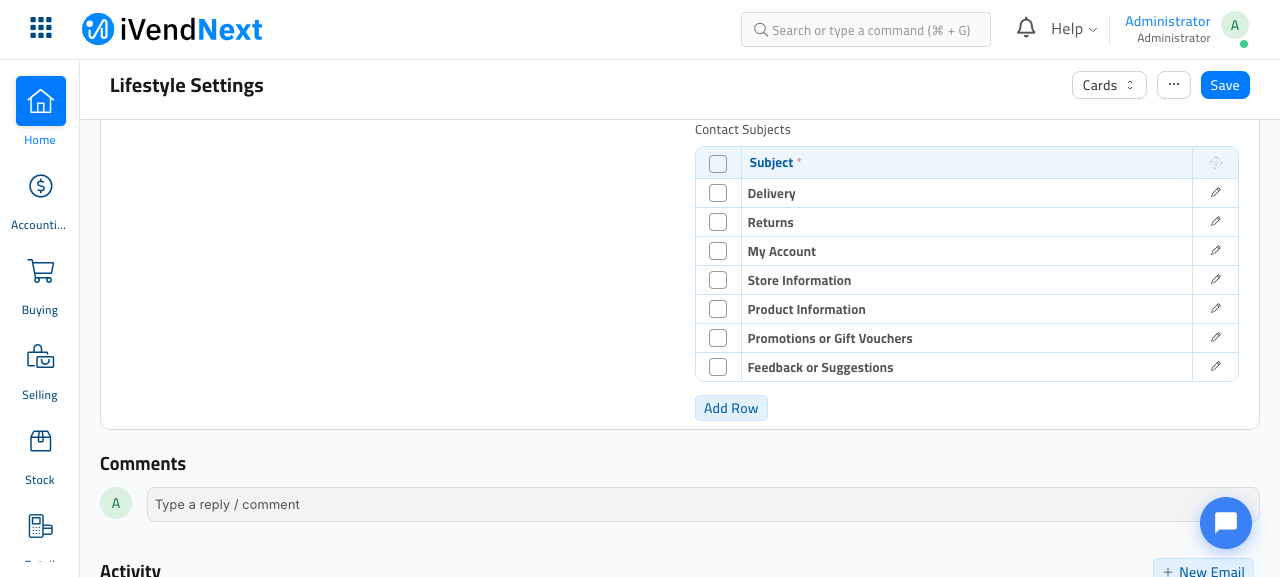
- Click Add Row and type a Subject for each option you want shoppers to choose from.
- Click Save.
How you know it worked: a green Saved message flashes, and your phone/email/hours will appear in the footer's Contact us column once you reload the storefront (Step 6).
Step 5 · Add your social‑media links
Click the Social Media tab. Paste the full web address of each profile you want shown as an icon in the footer.
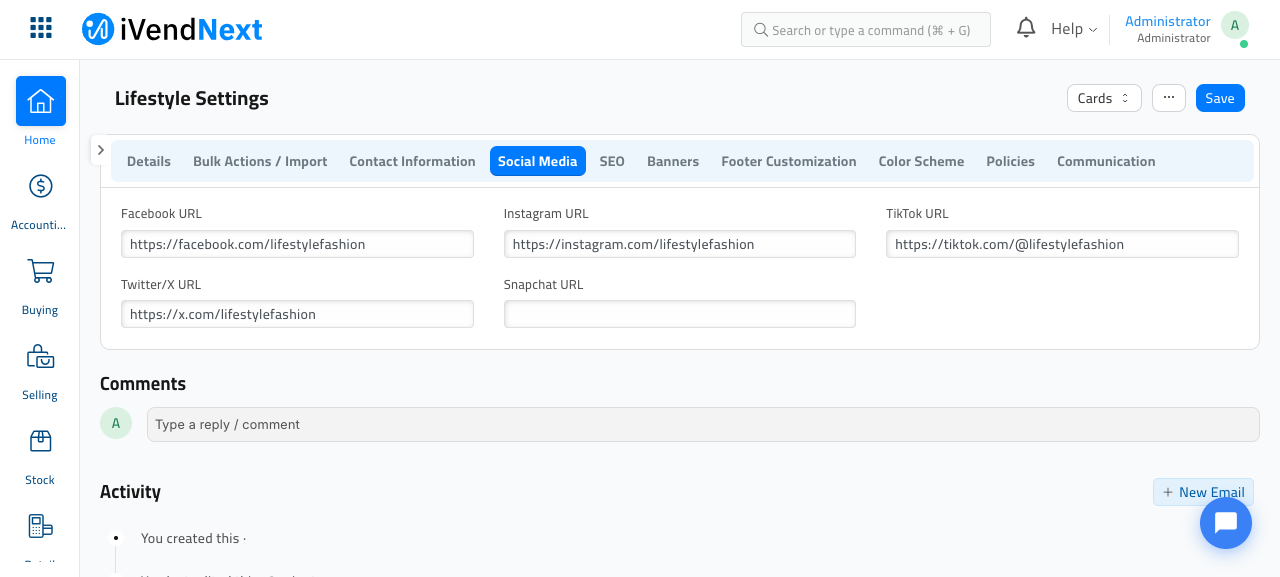
- Fill in any of Facebook URL, Instagram URL, TikTok URL, Twitter/X URL, and Snapchat URL (paste the full
https://…address). - Leave any you don't use empty — only the ones you fill in show up as icons.
- Click Save.
How you know it worked: each address stays in its box; empty fields simply won't produce an icon in the footer.
Step 6 · Check your live footer
Open your storefront home page at /en/ (see 01 · Welcome & First Login for the difference between admin and storefront), and scroll to the very bottom.
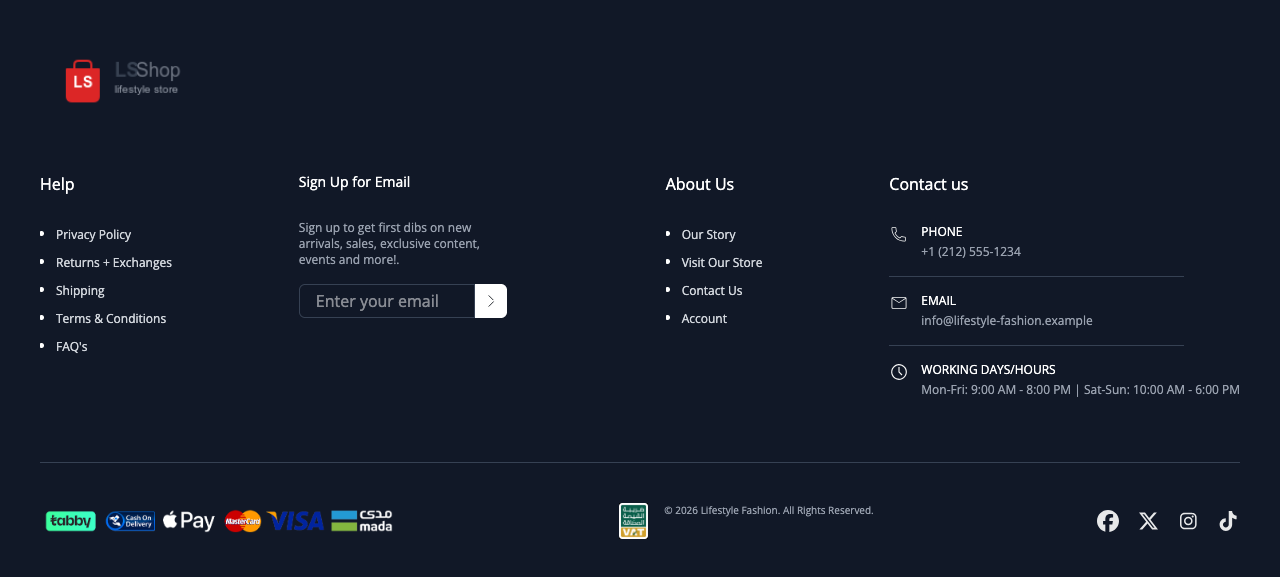
Confirm that:
- Your link columns (Help, About Us) show the labels you entered.
- The newsletter block shows your title and description.
- The Contact us column shows your phone, email, and working hours.
- The bottom bar shows your copyright line (with the year added automatically) and your social icons.
If something is missing, go back to the matching tab, check the value is filled and (for links) that Enabled is ticked, and save again.
Step 7 · Set up your Contact Us page
Your Contact Us page lives at /en/contact-us and is linked from the footer. It shows a contact form where shoppers pick a Subject (from the Contact Subjects you added in Step 4), enter their message, and send it to you.
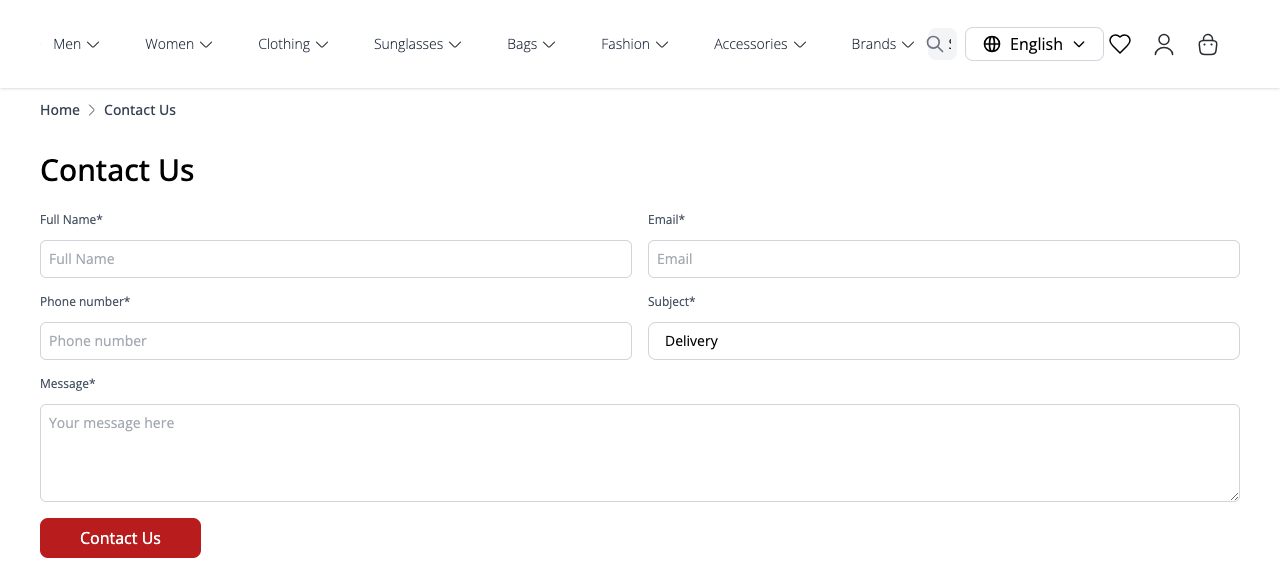
There is nothing extra to switch on — the page appears automatically once your theme is active. To review it, just open /en/contact-us and check the details and subject list read the way you want.
How you know it worked: the page loads with your Contact Us heading and a working form. Adjust the wording of the choices by editing the Contact Subjects table (Step 4).
Step 8 · Set up your Find Store page
Your Find Store page lives at /en/find-store and lets shoppers browse your physical shops on a map, filtered by city. Unlike the rest of this section, its store list does not come from Lifestyle Settings — each store is its own Shop address record.
Add a store
- Open the Desk search bar (Ctrl/Cmd + G), type Address, and press Enter, then click + Add Address.
- Fill in the store:
- Address Title — the store's display name, e.g. Lifestyle Fashion – Manhattan.
- Address Type — choose Shop. (This is what makes it appear on the Find Store page.)
- Address Line 1, City, State, Country, Postal Code, Phone, Email — the store's details.
- Store Location — drop a pin on the map for this shop (required for Shop addresses). This is what draws the map and the "Open in Google Maps" link.
- Click Save. Repeat for each physical store.
How you know it worked: open /en/find-store. Each Shop address appears as a card, the city filter lists your cities, and clicking a store shows its location on the map.
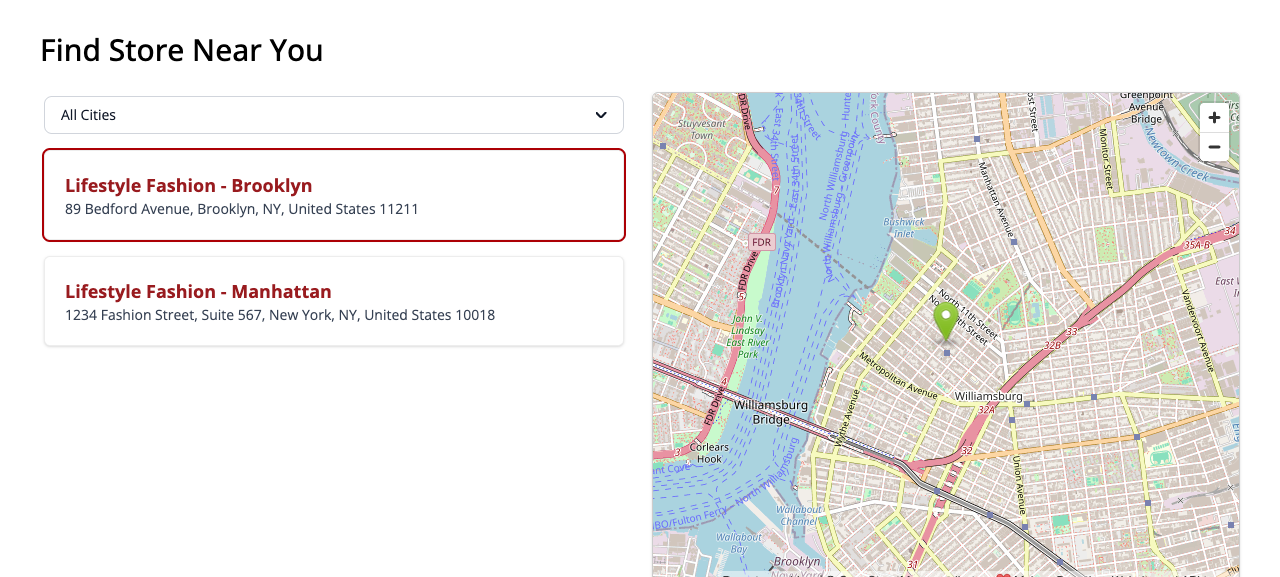
If the Find Store page says "No stores available", you have no addresses with Address Type = Shop yet — add at least one as above.
Where the footer and store pages come from
Here's the full picture of what you set in this section and where each piece shows up for shoppers:
flowchart TD
A["Footer Customization tab"] --> F["Footer newsletter,<br/>link columns & copyright"]
B["Contact Information tab"] --> F2["Footer 'Contact us' column"]
B --> C["Contact Us page /en/contact-us"]
D["Social Media tab"] --> F3["Footer social icons"]
E["Shop address records"] --> G["Find Store page /en/find-store"]
F --> STORE["Every storefront page"]
F2 --> STORE
F3 --> STORE
With your footer, contact page, and store locator in place, your storefront now has a complete, professional bottom section and working store‑info pages. Next, move on to 07 · Organize Your Catalog to start building the product categories shoppers browse by.
One‑time technical setup — ask your administrator
These are not shop‑owner steps; they are handled once by whoever installs and maintains the store:
- An active theme is required. The footer and the Contact Us / Find Store pages are rendered by your active storefront theme. A brand‑new site has no theme records until an administrator scaffolds and activates one — see 04 · Choose & Activate Your Theme. Without an active theme there is no footer to configure.
- Google Maps embed links. The Contact page map expects a Google Maps embed URL (the kind you get from Share → Embed a map on Google Maps). If you only have a normal maps link, ask your administrator or team to convert it to the embed form.