Discounts, Coupons & Promotions
This section is about giving shoppers a reason to buy now. You'll set up two things:
- Announcement banners — the short message strip that runs across the very top of every storefront page ("Summer Sale — 20% off…"). This is your megaphone.
- Coupon codes — a code such as
SUMMER20that a shopper types at checkout to get money off. The discount appears on their order total, and every active coupon is also listed for logged-in shoppers on their Discounts page.
Banners are quick and fully in your hands. Coupons are more powerful but have a few technical settings behind them — this guide shows you the parts you own and flags the parts to hand to your administrator.
Before you start (prerequisites)
Complete these first:
- 08 · Add Your First Products — you need real, priced products so a coupon has something to discount and a shopper has something to buy.
- 03 · Your eCommerce Settings Hub (Lifestyle Settings) — banners live on a tab of the Lifestyle Settings page, so you should already know how to open and save it.
- You are logged in to the admin (Desk). Open any settings page from the Desk search bar: press Ctrl/Cmd + G and type its name.
A note on money symbols: the amounts in the screenshots use this store's currency. Yours will show whatever currency you set in 02 · Store Foundations.
Part A · Announcement banners
An announcement banner is the thin strip of text at the very top of the storefront, above your logo and menu. It shows on every page, so it's the best place for a store-wide message: a sale, free-shipping news, a holiday notice, or a coupon code to advertise.
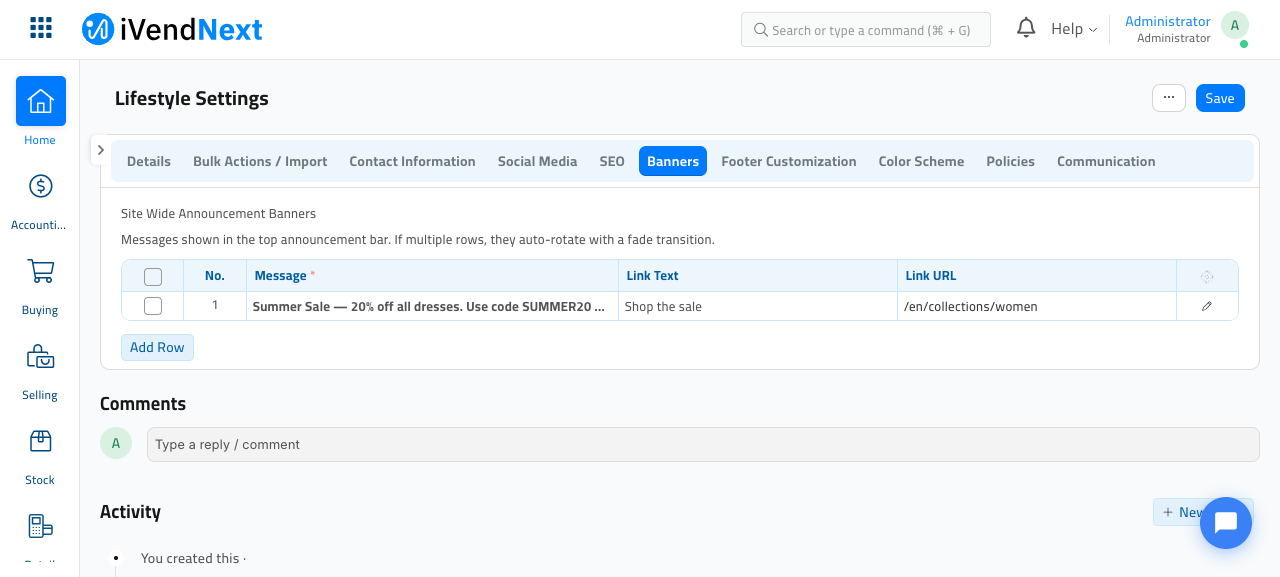
Banners live on the Banners tab of the Lifestyle Settings page. Each row is one message. If you add more than one row, they auto-rotate with a gentle fade.
Step 1 · Open the Banners tab
- Press Ctrl/Cmd + G, type Lifestyle Settings, and open it.
- Click the Banners tab along the top of the page.
You'll see a table called Site Wide Announcement Banners.
Step 2 · Add a banner message
- Click Add Row.
- Fill in the three columns:
- Message — the words shoppers see, for example Summer Sale — 20% off all dresses. Use code SUMMER20 at checkout.
- Link Text (optional) — the clickable words at the end of the message, for example Shop the sale. Leave blank for a message with no link.
- Link URL (optional) — where the link goes, for example
/en/collections/womenor/en/products?category=women. Start storefront links with/en/.
- Click Save (top right, or Ctrl/Cmd + S).
To run several messages at once, add more rows. They rotate automatically at the top of the store — good for pairing "Free shipping over ﷼200" with "New winter arrivals". To take a banner down, delete its row and save.
How you know it worked: open your storefront home page (/en) in a new tab and look at the very top — your message runs across the announcement strip, above the logo and menu.

Part B · Coupon codes
A coupon is a code a shopper enters at checkout to get a discount — for example SUMMER20 for 20% off. In this store, coupons are more than a simple "code = percentage" rule: they are part of the promotions engine, so a single coupon can be limited to certain days, a minimum spend, specific products or categories, and a specific store/warehouse.
Because of that power, creating a coupon has two kinds of settings:
- The plain-language parts you own — the code, the discount amount, a description, whether it's active, and its dates.
- The technical targeting parts — which store and which products the coupon applies to. These gate saving and use warehouse / category names, so they're best set with your administrator (see the callout at the end).
How a coupon travels from you to the shopper
flowchart LR
    A[You create a Coupon<br/>code + discount + Active] --> B[Shopper's Discounts page<br/>lists every active coupon]
    A --> C[Shopper types the code<br/>at checkout]
    C --> D{Engine checks:<br/>active? dates? min spend?<br/>right products & store?}
    D -- passes --> E[Discount line added<br/>Total goes down]
    D -- fails --> F[Code rejected<br/>Total unchanged]
Step 3 · Open the Coupon page
- Press Ctrl/Cmd + G, type Coupon, and open it.
On a brand-new store the list is empty.
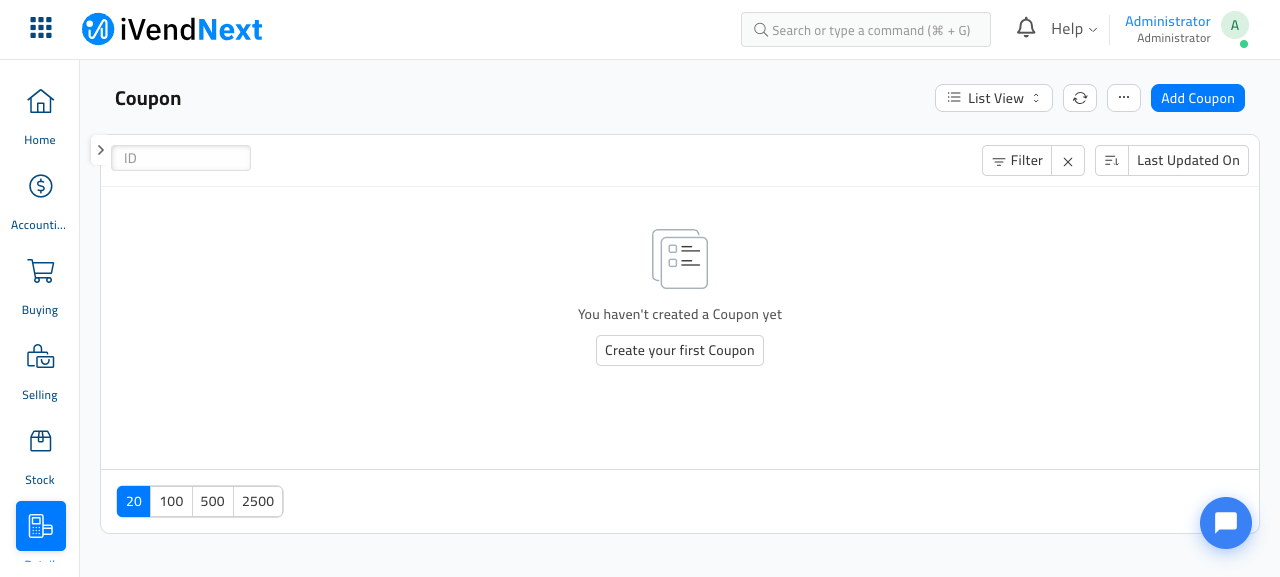
- Click Create your first Coupon (or Add Coupon).
Step 4 · Fill in the parts you own
On the new coupon form, set these:
- Coupon Code — the code shoppers type, for example
SUMMER20. Keep it short and easy to type. - Description — a friendly line shown to shoppers on their Discounts page, for example 20% off clothing this summer.
- Discount Type — choose Percent for a percentage off, or Amount for a fixed money value off.
- Discount — the number:
20for 20% off (Percent), or50for ﷼50 off (Amount). - Active — tick this so the coupon works and appears to shoppers. Untick it to switch the coupon off without deleting it.
- Has Effective Date (optional) — tick it to make the coupon valid only between a Start Date and End Date. Leave it unticked for a coupon with no expiry.
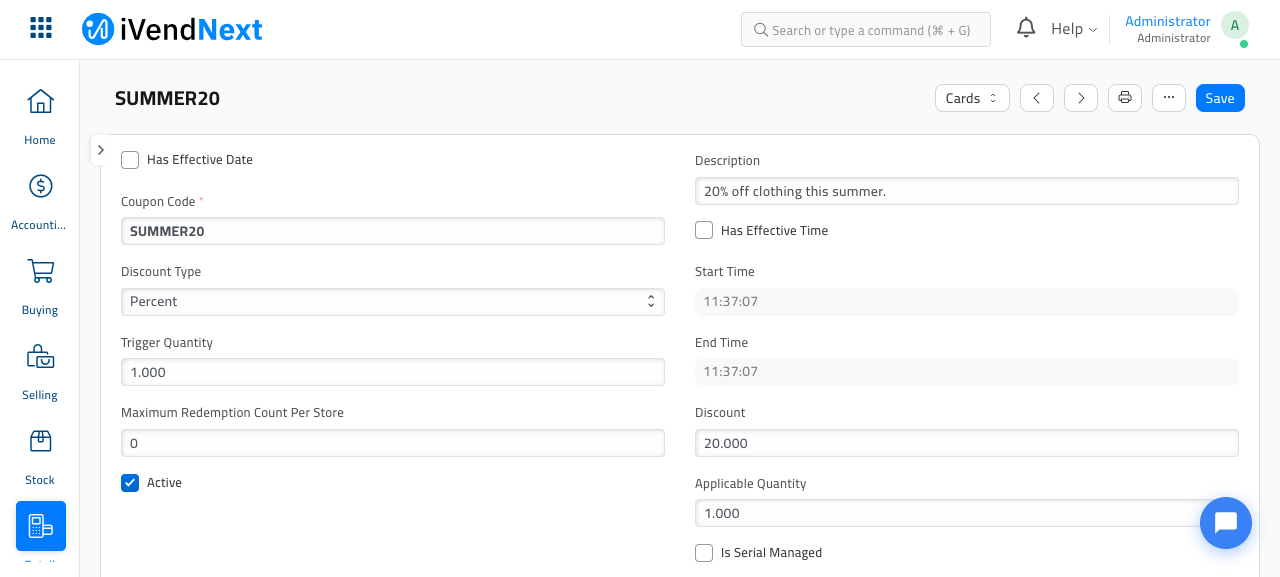
Before you can save, the coupon also needs its targeting filled in — the store it applies to and the products it discounts. Those fields are covered in the administrator callout at the end of this section. Once they're set, click Save; the coupon is now live.
Step 5 · Check it appears for shoppers
Every active coupon is automatically listed for logged-in shoppers on their Discounts page (My Account → Discounts → Coupons). This is how shoppers discover codes without you emailing them.
To see it, open the storefront, sign in as a shopper, and go to /en/account/discounts → Coupons tab.
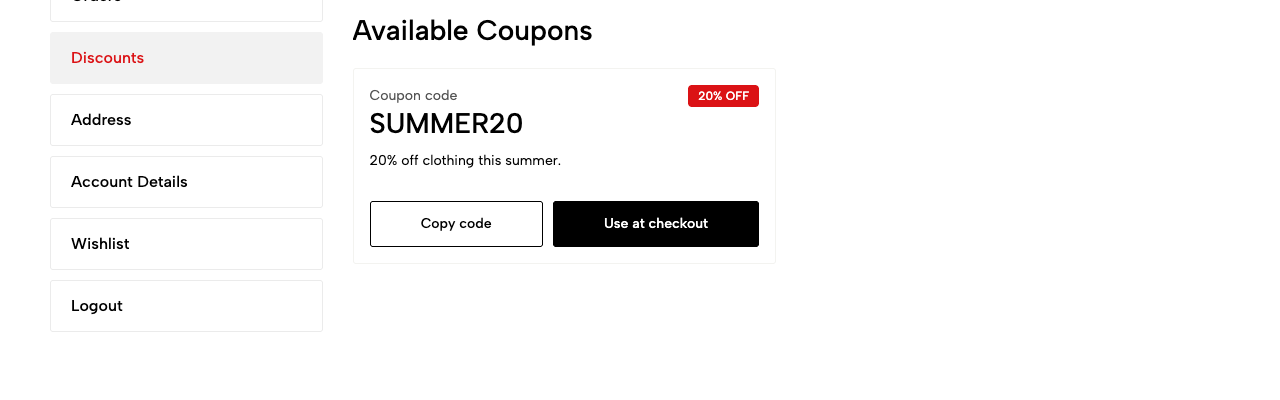
How you know it worked: the coupon card shows your code, the discount badge, and your description. Copy code copies the code to the clipboard; Use at checkout takes the shopper to checkout with the code already filled in.
Step 6 · See the discount apply at checkout
This is the moment that matters. When a shopper reaches checkout, the order summary has a Promo code or gift card box. They type the code and click Apply.
If the coupon passes all its checks, a Discount line appears in the summary and the Total drops.
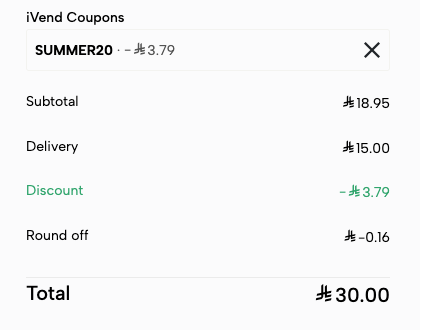
How you know it worked: the applied coupon shows as a chip at the top of the summary, the Discount line shows the money taken off (here ﷼3.79 — 20% of the ﷼18.95 item), and the Total reflects it. The shopper can remove the coupon with the ✕ on the chip.
If a code is rejected, the Total simply doesn't change. The usual reasons: the coupon isn't Active, today is outside its dates, the cart is below the coupon's Minimum Bill Amount, or the cart doesn't contain the products the coupon targets. Re-check those settings on the Coupon page.
The full picture
Here's how banners and coupons sit alongside the products you built earlier.
flowchart TD
    subgraph own["What you set up"]
        P[Products with prices<br/>section 08]
        BAN[Banner message<br/>Lifestyle Settings › Banners]
        COU[Coupon code + discount<br/>Coupon page]
    end
    subgraph store["What the shopper sees"]
        STRIP[Announcement bar<br/>on every page]
        DISC[Discounts page<br/>lists active coupons]
        CHK[Checkout<br/>enters code → Discount line]
    end
    BAN --> STRIP
    COU --> DISC
    COU --> CHK
    P --> CHK
Quick checklist
- At least one banner message is added on Lifestyle Settings → Banners and shows on the storefront top strip.
- Your coupon has a Coupon Code, a Discount Type + Discount, and Active is ticked.
- The coupon's store and product targeting are set (with your administrator) so it saves and applies.
- The coupon appears on the shopper Discounts page.
- A test checkout with the code shows a Discount line and a lower Total.
Next, make your store easy to find and share in 14 · SEO & Social Sharing, and when everything's ready, run the launch checks in 17 · Preview & Go Live.
One-time technical setup — ask your administrator
A coupon in this store is part of the promotions engine, so a few required fields sit below the friendly ones on the Coupon page. They involve warehouse and category names, so have your administrator confirm them the first time — after that, you can reuse the same coupon as a template:
- Applicable store (warehouse) — a coupon must list at least one Warehouse it applies to, under Applicable Source. Use the same warehouse you selected as your Ecommerce Warehouse in 12 · Shipping, Taxes & Pricing (for example Stores - LD).
- Target products — a coupon must say which items it discounts, under the Coupon Items / "get" table. This can be a single Item, a whole Item Group (category, e.g. Clothing), or a Brand, with a quantity and the discount. This is what limits
SUMMER20to, say, clothing only.- Applicability days — the Coupon form auto-fills all seven days of the week when you create it; leave them as-is unless you want the coupon to work only on certain days.
- Promotion Type / advanced limits — fields such as Promotion Type, Minimum Bill Amount, Maximum Redemption Count and serial-number handling fine-tune how the coupon behaves. Leave the defaults unless you have a specific rule in mind.
None of these change day-to-day: once one working coupon exists, duplicating it for the next promotion is a two-minute job.