AfterShip Connector
AfterShip Connector
The AfterShip Connector is a standalone Frappe app that plugs AfterShip into the iVend storefront as both a multi-carrier shipping aggregator (labels / AWB via the Postmen Shipping API) and a tracking provider (AfterShip Tracking API).
It follows a standard shipping-connector integration pattern: a Delivery Note button spins up a submittable ERPNext Shipment that buys a carrier label, creates a tracking, and writes the AWB / label / status back onto the Sales Order through the existing custom_* seam fields. Because the storefront already reads those seam fields, no storefront changes are required.
The connector does not define its own shipment doctype — it customizes ERPNext's native Shipment (Custom Fields on an existing doctype, navgold-style). The native Shipment already carries pickup / delivery addresses, carrier / carrier_service, awb_number, tracking_url, tracking_status, shipment_id, shipment_amount, value_of_goods, shipment_delivery_note, and — importantly — a shipment_parcel table for accurate box dimensions. AfterShip-specific data lives in a small set of custom_* fields on Shipment (shipper account, slug, service type, tracking id, selected rate, return flag, label URL, tag / subtag, cost amount / currency), plus the AfterShip Settings single and the AfterShip Webhook Log.
Overview
- Provider is swappable. The integration is hardcoded via
custom_*fields on the Sales Order — so AfterShip can be replaced without touching checkout or the storefront. - What it does
- Forward: Sales Order → Delivery Note → Create AfterShip Shipment → an ERPNext
Shipment(draft, with a box) → buys a carrier label (AWB + PDF), creates a tracking, and writescustom_awb_number/custom_label_url/custom_ecommerce_status = Shippedback to the Sales Order and its items. - Return: return Delivery Note (
make_sales_return) →Shipmentwith the parties swapped → return label + tracking →custom_return_status = Scheduled. - Status sync:
sync_status()polls the tracking and maps AfterShip tags onto the Sales Order status fields.
- Forward: Sales Order → Delivery Note → Create AfterShip Shipment → an ERPNext
- Customer-facing: the storefront "Track Order" modal reads the seam fields and renders carrier, AWB, a status badge, and the checkpoint timeline.
Architecture
graph TD
    Settings[AfterShip Settings<br/>api_key, hosts, default parcel + service] -.creds.-> Client
    DN[Delivery Note] -->|Create AfterShip Shipment| Factory[create_aftership_shipment factory]
    Factory --> Shipment[ERPNext Shipment<br/>native doctype + custom_* fields]
    Parcel[Shipment Parcel table<br/>parcel_template picker<br/>L / W / H / weight / count] --> Shipment
    Shipment -->|before_submit| Client{AfterShip Client}
    Client --> Shipping[ShippingClient<br/>buy label / AWB / PDF]
    Client --> Tracking[TrackingClient<br/>create tracking]
    Shipping -->|AWB + label_url + cost| Writeback
    Tracking -->|tracking id + tag| Writeback[on_submit write-back<br/>to Sales Order seam fields]
    Writeback --> SO[Sales Order<br/>custom_awb_number<br/>custom_label_url<br/>custom_ecommerce_status]
    SO --> Modal[Customer Track Order modal<br/>ecomus storefront]
The AfterShipClient base handles auth headers and request / error handling; ShippingClient (Postmen) and TrackingClient extend it. AfterShip Settings (Single) feeds all credentials and host selection, plus the default parcel template and default service type. The parcel dimensions that go on the label come from the native Shipment's shipment_parcel table (see Package & box size).
Setup
- Install the app on your site:
bench --site <site> install-app aftership_connector
-
Configure AfterShip Settings (a Single doctype). Open AfterShip Settings and set:
api_key— your AfterShip API key (Password field; stored only here, never in code).test_mode— toggle on for sandbox, off for production.default_shipper_account_id— a connected carrier from AfterShip → Shipping → Carrier accounts.default_slug— courier slug (defaultfedex).default_parcel_template— the box preset (e.g. Medium) pre-filled onto new shipments.default_service_type— the fallback service when no rate is picked.auto_select_cheapest_rate— auto-buy the cheapest quote (see Auto-cheapest).- Click Test Connection to confirm carriers are visible.
-
Sandbox note. With
test_modeon, the Shipping (Postmen) test host ishttps://sandbox-api.aftership.com/postmen/v3. The FedEx test account buys clean labels with US addresses (the FedEx sandbox needs US ship-from / ship-to). The Tracking host is the same for test and production.
Forward flow — create a shipment
- Create and submit a Delivery Note from the Sales Order (stock leaves the warehouse).
- On the submitted Delivery Note, open the Create menu and click AfterShip Shipment (first item in the dropdown):
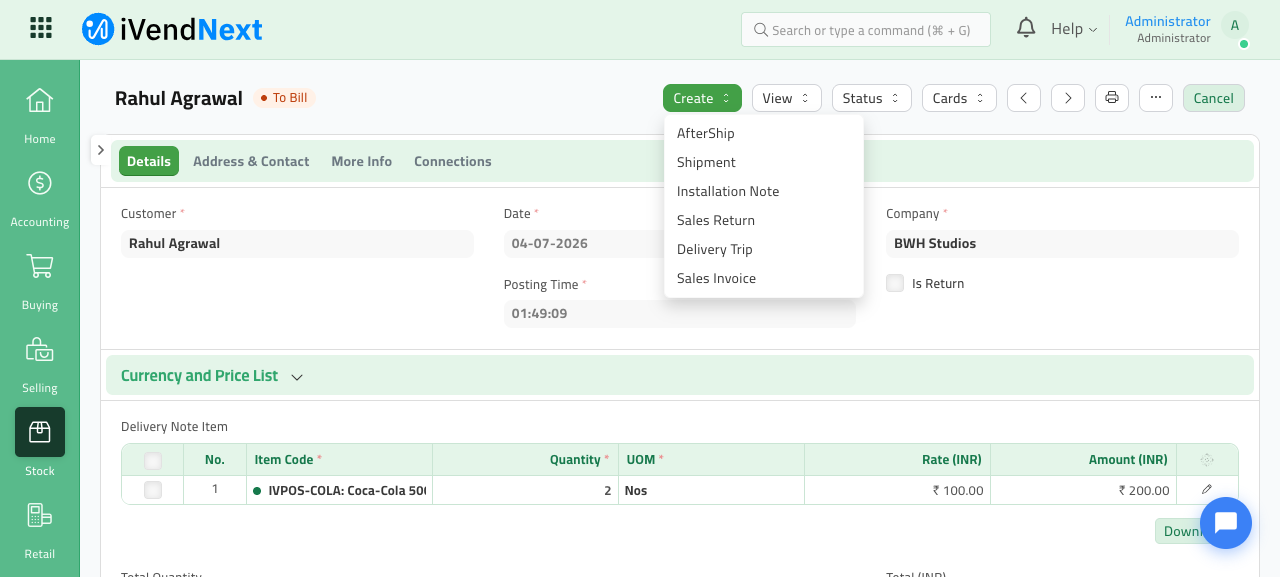
- This opens a draft ERPNext
Shipmentpre-filled with the pickup / delivery parties and a box. Set the box size and weight (see Package & box size), then Get Rates and pick a carrier. - Submit the
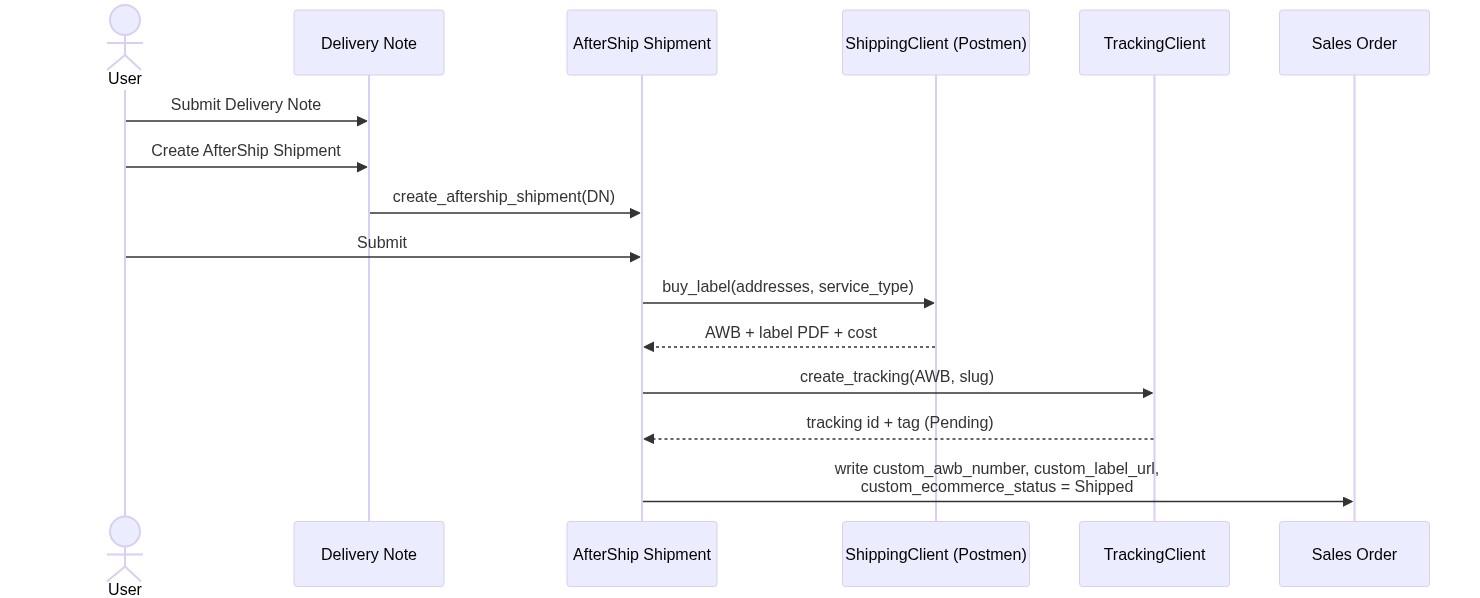
Shipment. On submit it:- buys a carrier label via
ShippingClient(service type e.g.fedex_express_saver; the real cost is read from the label response), - creates a tracking via
TrackingClient, - writes
custom_awb_number,custom_label_url, andcustom_ecommerce_status = Shippedback to the Sales Order and its items.
- buys a carrier label via
Package & box size
The label is only as accurate as the box it's built from, so the connector drives dimensions off the native Shipment's shipment_parcel table rather than any hardcoded box.
- Parcel template picker. Each parcel row has a
parcel_templatefield — pick a predefined box (Small / Medium / Large) and its length / width / height fill in automatically. New shipments start from thedefault_parcel_templateset in AfterShip Settings. You can still override any dimension per shipment. - Weight is auto-suggested but editable. The parcel
weightis seeded from the packed item weights, but it's a plain editable field — set it to the real gross packed weight (box + padding + contents) so the rate and label match what the carrier actually weighs. - Hard safeguard — no accurate box, no label. Before rating or buying a label, the connector throws if any parcel row is missing dimensions or weight. This is deliberate: it prevents the old "hardcoded box" problem where every shipment shipped at a guessed size. Fix the parcel row and retry.
Together these give accurate labels: the dimensions on the AWB match the box you actually ship, and rate quotes reflect the true dimensional weight.
Choosing a carrier / rates
The shipment picks its carrier with a clear precedence: a manual pick (via the Get Rates modal) wins first; otherwise, if the auto-cheapest toggle is on, it rate-shops and buys the cheapest; otherwise it falls back to the default carrier from AfterShip Settings (default_shipper_account_id / default_slug / default_service_type).
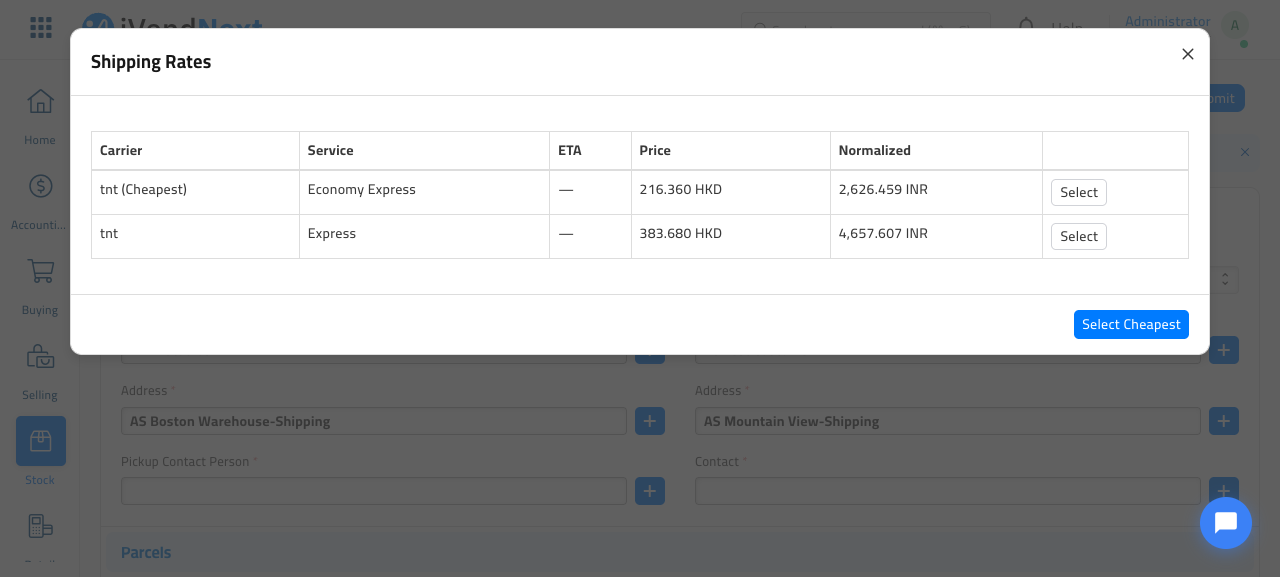
Get Rates modal (Desk)
On a draft Shipment (with a valid box — see Package & box size), click Get Rates. It queries all connected carriers at once and lists every quote (carrier · service · ETA · price). Because carriers can quote in different currencies, the modal shows a separate Normalized (company currency) column — each raw quote is converted via its exchange rate — and sorts the rows cheapest-first by that company-currency amount, with a Cheapest badge on the lowest. Select any row, or Select Cheapest, and it fills the carrier / service / rate fields on the shipment.
Auto-cheapest
The auto_select_cheapest_rate toggle in AfterShip Settings automates the pick. When on, submitting a shipment you did not manually rate-pick makes it rate-shop and buy the cheapest by company currency (using the same normalized amounts as the modal). It respects a manual pick if one exists, and falls back to the default carrier if no rates return.
Customer tracking
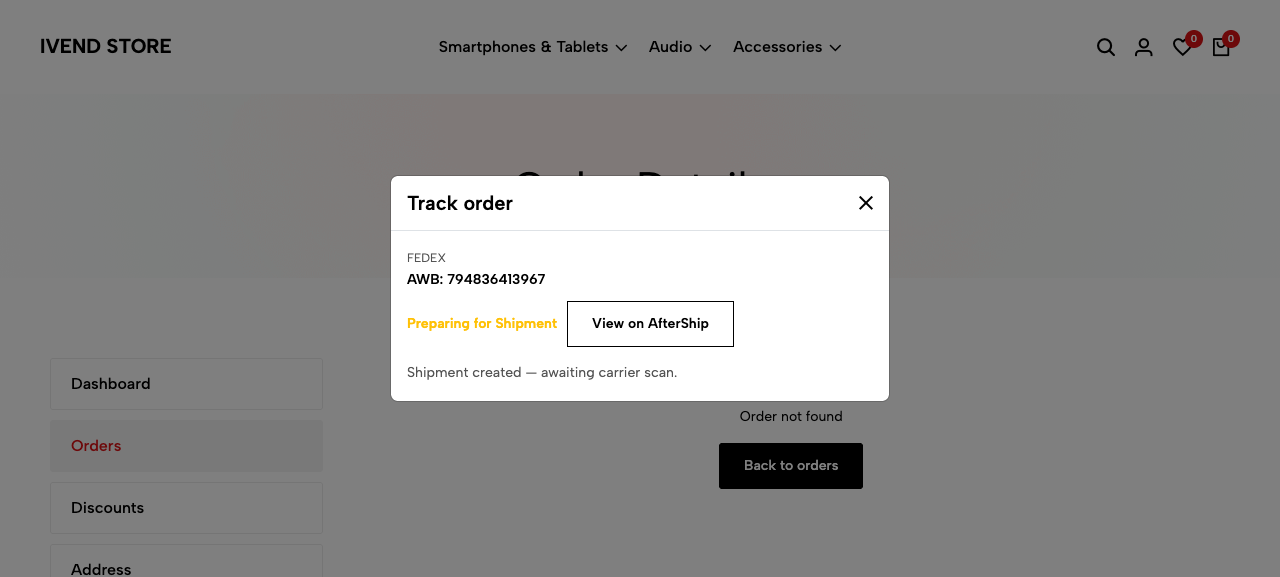
The storefront exposes a Track Order modal (an ecomus overlay, gated on custom_awb_number). It calls aftership_connector.api.tracking.get_order_tracking(order_id) (permission-checked) and renders:
- the carrier and AWB number,
- a status badge,
- the checkpoint timeline (time / message / location per scan),
- an "awaiting carrier scan" empty state when the label exists but no checkpoints have arrived yet,
- a "View on AfterShip" link that opens the full AfterShip tracking page at
track.aftership.com/{slug}/{awb}.
sync_status() polls the tracking and maps the AfterShip tag to the Sales Order status via FORWARD_STATUS_BY_TAG (see Status reference). For real-time updates without polling, see Webhooks (real-time tracking).
Return flow
A return is a normal label with ship_from / ship_to swapped — no special carrier flag is needed.
- Create a return Delivery Note with
make_sales_return(is_return = 1,return_against= the forward DN) and submit it — stock comes back into the warehouse. - Build a
Shipmentfrom the return DN. The factory setscustom_is_returnfrom the DN and swaps the parties. On submit it buys a return label + tracking and setscustom_return_status = Scheduled.
graph LR
    RDN[Return Delivery Note<br/>make_sales_return, is_return=1] --> RShip[ERPNext Shipment<br/>parties swapped]
    RShip --> RLabel[Return label + tracking]
    RLabel --> RStatus[custom_return_status]
    RDN -.ecommerce app hook.-> Money[on_return_delivery_note_submit<br/>accounting reversal + SO to Returned]
IMPORTANT — the return leg never touches money. The AfterShip return shipment only attaches the return label + tracking and sets
custom_return_status. It does not create credit notes or refunds, and it does not changecustom_ecommerce_status. The ecommerce app's ownon_return_delivery_note_submithook already fires on the return DN and owns the full accounting reversal (and flips the Sales Order to Returned). Keep these two responsibilities separate.
Webhooks (real-time tracking)
AfterShip can push tracking updates to the app so status flows in real time, instead of relying only on the manual sync_status() poll.
Setup:
- Set a
webhook_secretin AfterShip Settings. - In the AfterShip dashboard → Notifications → Webhooks, register the same secret and point the endpoint at:
https://<your-host>/api/method/aftership_connector.api.webhooks.receive_tracking_webhook
Security: each request is HMAC-SHA256 verified over the raw body against the aftership-hmac-sha256 header; invalid signatures are rejected. Every receipt is written to an AfterShip Webhook Log for audit.
Note: for local testing you need a public tunnel (e.g. ngrok), since AfterShip cannot reach a localhost site.
Status reference
AfterShip tag → Sales Order status mapping.
Forward (FORWARD_STATUS_BY_TAG → custom_ecommerce_status):
| AfterShip tag | Sales Order custom_ecommerce_status |
|---|---|
| Pending | Preparing for Shipment |
| InfoReceived | Preparing for Shipment |
| InTransit | Shipped |
| OutForDelivery | Shipped |
| AttemptFail | Shipped |
| AvailableForPickup | Shipped |
| Delivered | Delivered |
| Exception | (left unchanged; logged) |
| Expired | (left unchanged; logged) |
Return (RETURN_STATUS_BY_TAG → custom_return_status, no accounting side-effects): the return tracking drives custom_return_status (e.g. Scheduled on label creation), and never custom_ecommerce_status.
Troubleshooting / notes
- Missing box dimensions block rating and labels. The connector throws if a parcel row has no dimensions / weight — fill the
shipment_parcelrow (pick aparcel_templateand set the real weight) and retry. See Package & box size. - Webhooks give real-time status. With a
webhook_secretconfigured, AfterShip pushes HMAC-verified updates (see Webhooks (real-time tracking));sync_status()polling remains available as a fallback. - The shipping key needs Shipping (Postmen) scope. A Tracking-only key can create trackings but cannot buy labels.
- Production needs a real connected carrier and real party addresses. The sandbox uses the FedEx test account with US test addresses; production requires a carrier connected under your AfterShip account and real ship-from / ship-to addresses.
- Country codes are alpha-3. The client requires ISO alpha-3 country codes (USA, AUS, ARE); the controller converts from Frappe's Country doctype.
/ratesmay return no quotes in the FedEx sandbox — this is non-fatal. The label is bought by passing a configuredservice_typedirectly, and the real cost is read from the label response.- Tests: real-DB tests (
FrappeTestCase) mocking only the outbound HTTP boundary.