Products with Variants (Size / Color / Swatches)
Some products come in more than one colour and size — a hoodie in White, Black and Brown, each available in S, M and L. In iVendNext these are called variant products. Instead of listing every size and colour as a separate product, you group them under one product page that shows a colour picker, a size picker, a Find your size guide, and (optionally) a You might also like row.
This section shows you how to turn a plain product into a variant product, how to give each colour its little colour chip (a swatch), and how to attach a size chart so shoppers can find their fit.
Where these live: everything here is reached from the Desk search bar (press Ctrl/Cmd + G) — there is no menu icon. You'll search for Style Attribute Configurator, Swatch and Size Chart. See 01 · Welcome & First Login for a refresher on the search bar.
Before you start (prerequisites)
- 08 · Add Your First Products — you should already know how to create a product. Variants build directly on top of ordinary products.
- A variant-ready product template must exist — one "parent" product that has its colour and size options defined, plus the individual sellable items underneath it (e.g.
Loose Fit HoodiewithLoose Fit Hoodie‑S,‑M,‑L). This template-and-variants structure is standard ERPNext and is set up on the product itself. See the technical callout just below. - 07 · Organize Your Catalog — each variant is filed under a category (Item Group) so shoppers can browse to it.
- 04 · Choose & Activate Your Storefront Theme — the colour and size pickers are drawn by your active theme, so a theme must be switched on to see the result.
One-time technical setup — ask your administrator
This part is not a shop-owner step. Building the product template — the parent item marked "Has Variants", its Item Attributes (the list of colours and the list of sizes), and the individual size/colour items underneath — is standard ERPNext product configuration. If you don't already have a template with its variants in place, ask whoever set up your catalogue, or follow the ERPNext product documentation in 08 · Add Your First Products.
Your administrator can also switch on "Create variants automatically on configurator creation" in Lifestyle Settings. With that turned on, the colour variants in Step 2 are generated the moment you save — you won't need to click the Generate Color Variants button yourself.
How a variant product fits together
Before clicking anything, here's the picture. You start from a product template that already knows its colours and sizes. You create one Configurator for it, which fans out into one variant per colour. Each colour variant carries its own sizes, photos and web address. Separately, Swatches give each colour a chip, and a Size Chart gives the whole category a fit guide.
flowchart TD
    A["Product template<br/>(ERPNext Item, e.g. Loose Fit Hoodie)<br/>colours + sizes defined"] --> B["Style Attribute Configurator<br/>template + which attribute is the colour"]
    B -->|Generate Color Variants| C1["Colour variant: White<br/>sizes S / M / L + photos"]
    B --> C2["Colour variant: Black<br/>sizes S / M / L + photos"]
    B --> C3["Colour variant: Brown<br/>sizes S / M / L + photos"]
    S["Swatches<br/>White / Black / Brown → colour chip"] -.colour chips.-> C1
    D["Size Chart<br/>Brand + Category → fit table"] -.Find your size.-> C1
    C1 --> E["Live product page<br/>colour + size picker"]
    C2 --> E
    C3 --> E
You'll build this left-to-right: Configurator → Variants → Swatches → Size Chart → check it live.
Step 1 · Open (or create) the Style Attribute Configurator
The Configurator is where you tell the store "this product has variants, and this is the attribute that drives its colours."
- Press Ctrl/Cmd + G, type Style Attribute Configurator, and open it.
- Click + Add Style Attribute Configurator (or open an existing one to review it).
- Fill in two fields:
- Item Template — the parent product (for example
LOOSE-FIT-HOODIE). - Item Attribute — the option that separates the colours, usually Colour (labelled Item Attribute).
- Item Template — the parent product (for example
- Click Save.
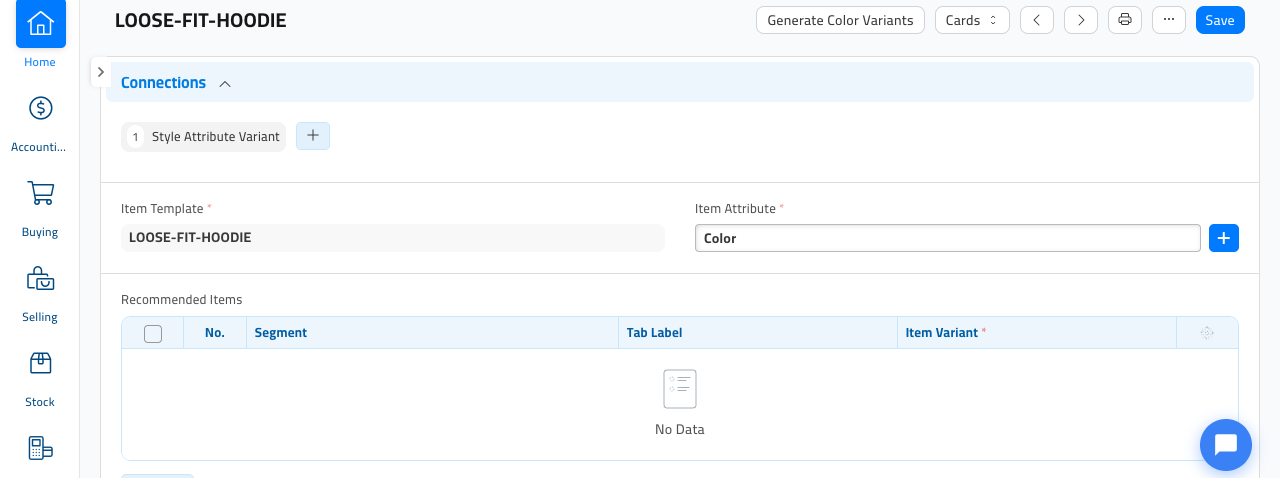
How you know it worked: the record saves, and a Generate Color Variants button appears at the top right. The Connections strip shows how many Style Attribute Variants this configurator has produced (0 until you generate them).
Recommended Items (optional). The Recommended Items table at the bottom is the "You might also like" row on the product page. You can leave it empty for now and add cross-sell products later.
Step 2 · Generate the colour variants
- On the saved Configurator, click Generate Color Variants.
- Wait for the green Variants generated! message.
Behind the scenes the store reads every colour under your template and creates one Style Attribute Variant per colour — each already carrying the right sizes.
How you know it worked: the Connections strip now shows a count next to Style Attribute Variant (for example "3"). Click it to see the generated colour variants.
If your administrator switched on automatic generation (see the technical callout above), the variants are already there the moment you saved Step 1 — you can skip straight to Step 3.
Step 3 · Finish and publish each colour variant
Generated variants start unpublished and often need photos before they can go live. Open each one and complete it.
- Open a Style Attribute Variant (for example
LOOSE-FIT-HOODIE - White). - Check the details:
- Display Name — the product name shown to shoppers.
- Route — the web address ending (e.g.
loose-fit-hoodie). It fills in automatically; you rarely need to change it. - Sizes — the list of sizes and the exact sellable item behind each one. This is filled from the template.
- Images — add at least one product photo. A variant cannot be published without images.
- Tick Is Published?.
- Click Save.
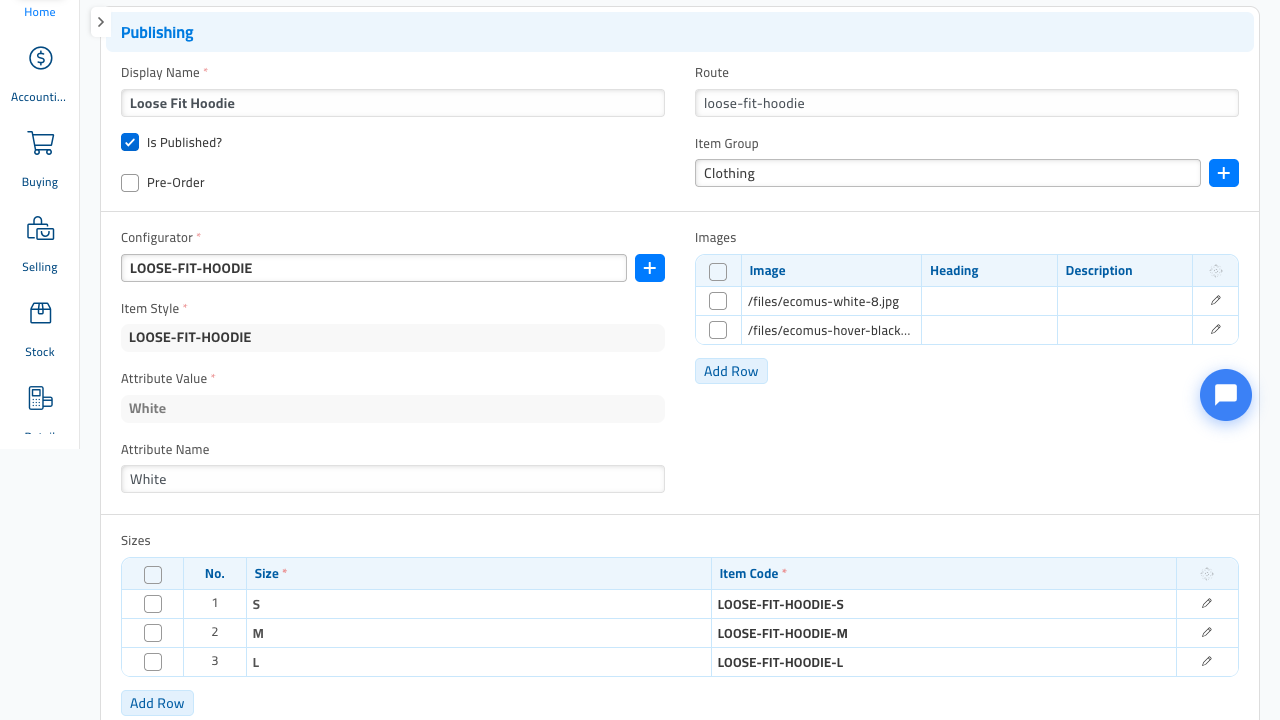
How you know it worked: the record saves with Is Published? ticked. If you tick it while photos or sizes are missing, the store un-ticks it and tells you what's still needed — add the missing photos or sizes and save again.
Pre-Order — tick this if you want shoppers to be able to order the colour before it's in stock. Leave it off for normal selling.
Step 4 · Add a Swatch for each colour
A Swatch turns a colour name (like "Brown") into the little coloured chip shoppers see in the colour picker. Without a swatch the colour still works — it just shows as text with no chip.
- Press Ctrl/Cmd + G, type Swatch, and open it.
- Click Add Swatch.
- Name the swatch exactly as the colour is spelled on your products —
Brown,Light Green,White. The name has to match, or the store can't pair the chip to the colour. - In the Color field, click the colour box and pick the shade that best represents that colour (for example a warm brown for "Brown").
- Click Save, and repeat for every colour you sell.

How you know it worked: your Swatch list shows one entry per colour, each named after a colour you sell.
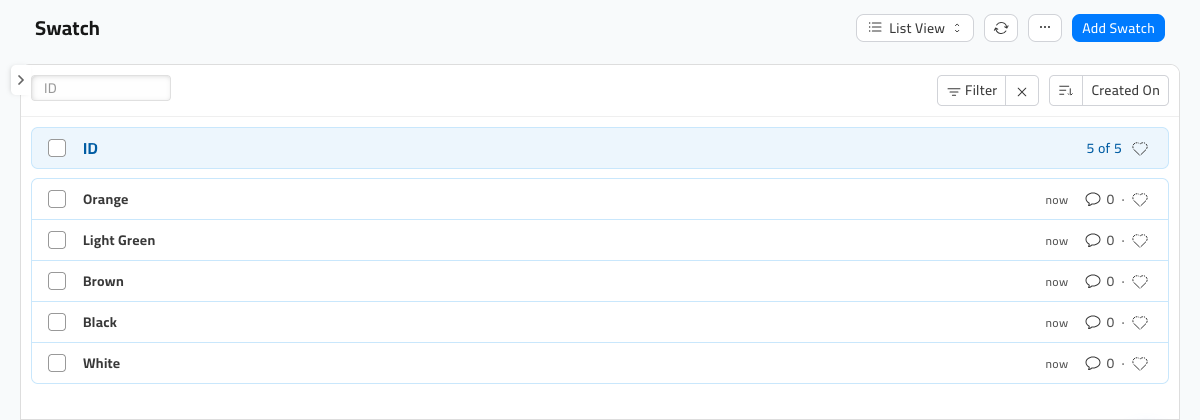
Tip: create one swatch per colour name in your whole catalogue, not per product. "Black" is defined once and reused by every black product.
Step 5 · Add a Size Chart (the "Find your size" guide)
A Size Chart is the fit table shoppers open from the Find your size link on a product page. Each chart is matched to products by two things: the Brand and the Category (Item Group). So one chart can cover, say, all Lifestyle products in Clothing.
You supply the chart as a simple spreadsheet (.xlsx) — one header row, then one row per size. The store reads the spreadsheet and shows it as a neat table.
- Prepare a spreadsheet: the first row is your column headings (e.g. Size, Chest (in), Waist (in), Length (in)), then one row per size (S, M, L, XL…).
- Press Ctrl/Cmd + G, type Size Chart, and open it.
- Click Add Size Chart and fill in:
- Brand — the brand these products belong to.
- Item Group — the category these products sit in (e.g.
Clothing). - Size Chart — click to upload your
.xlsxfile. (Only.xlsxfiles are accepted.)
- Click Save.
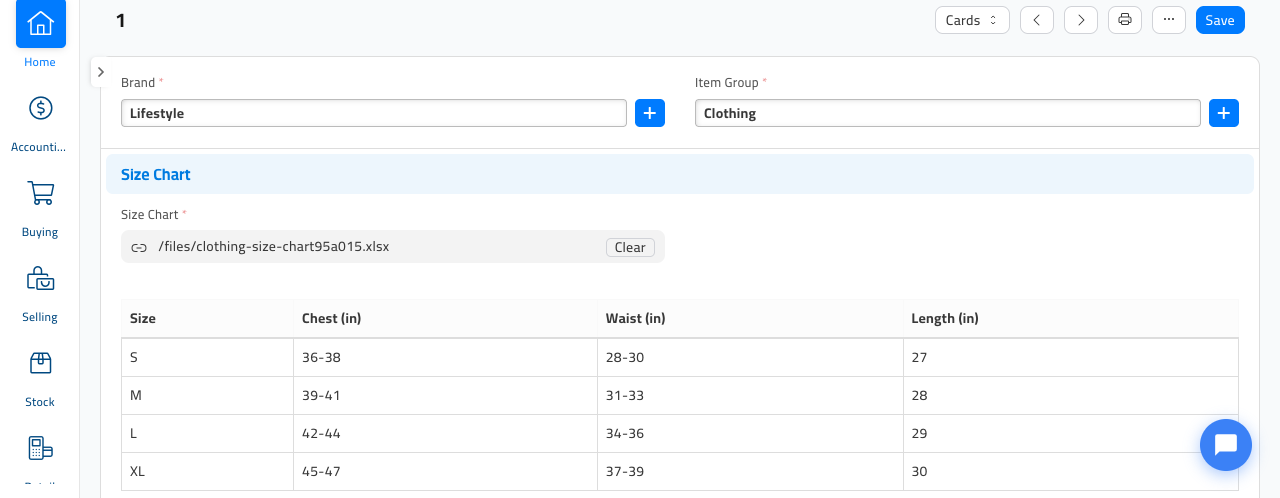
How you know it worked: a preview table of your chart appears right on the form after saving — that's exactly what shoppers will see. Only one chart is allowed per Brand + Category combination; if you try to add a duplicate, the store will stop you.
The chart only appears if the product has a matching Brand and Category. If Find your size doesn't show up on a product page, check that the product's Brand and Category match a Size Chart you've created.
Step 6 · See it on the live storefront
Open the product you published in a browser tab to check the shopper's view.
- Go to your store and open the product, or use its web address directly (for this store,
http://ivend-docs.localhost:8000/en/products/loose-fit-hoodie). - If the page was already open, refresh it.
You should see the variant picker: the colour label (with chips when you have swatches and more than one colour), a Size picker, a Find your size link, and a quantity stepper. Out-of-stock sizes appear greyed out; in-stock sizes are selectable.
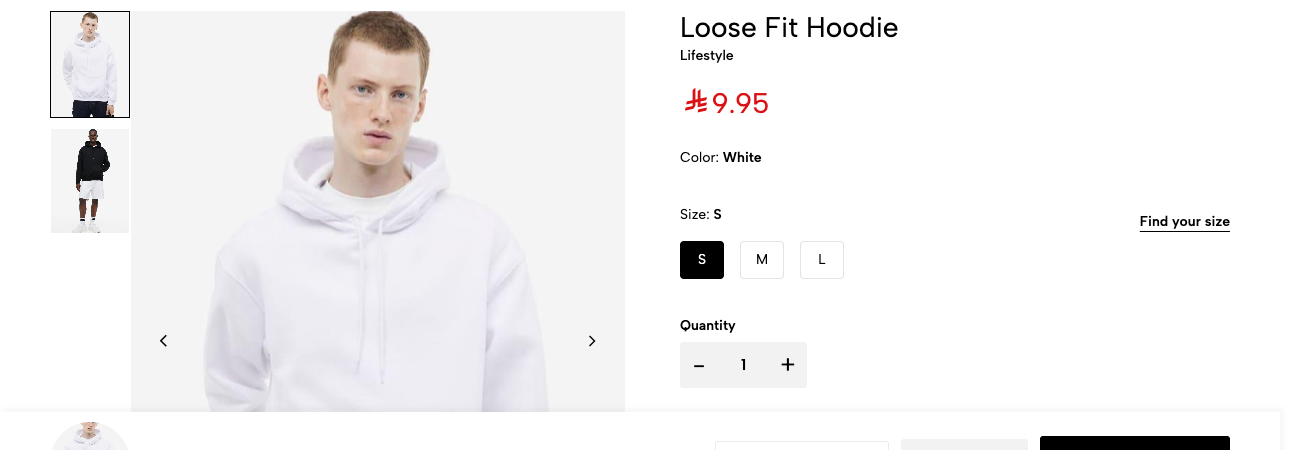
Click Find your size to open the size chart you built in Step 5.
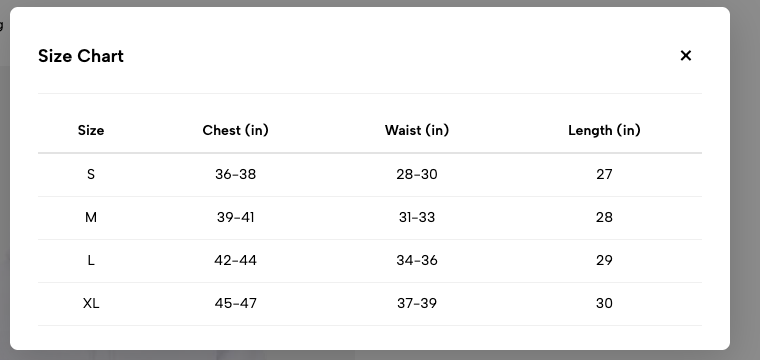
How you know it worked: shoppers can pick a size, the Find your size guide opens your table, and (when you sell more than one colour under the same template) each colour shows as a clickable chip that jumps to that colour's page.
Where each piece shows up
If something looks wrong on the storefront, this table points you to the setting that controls it.
flowchart LR
    A["Colour chip missing<br/>next to the colour name"] --> A1["Add a Swatch (Step 4)<br/>named exactly like the colour"]
    B["No size buttons<br/>on the product page"] --> B1["Check the variant's<br/>Sizes table (Step 3)"]
    C["Find your size<br/>link not showing"] --> C1["Size Chart Brand + Category<br/>must match the product (Step 5)"]
    D["Product not on the store<br/>at all"] --> D1["Tick Is Published? and add<br/>images on the variant (Step 3)"]
    E["Wrong 'you might also<br/>like' products"] --> E1["Edit Recommended Items<br/>on the Configurator (Step 1)"]
Quick recap
- Style Attribute Configurator — pick the template + the colour attribute, Save.
- Generate Color Variants — one variant per colour, each with its sizes.
- Open each Style Attribute Variant — add photos, tick Is Published?, Save.
- Swatch — one per colour name, named exactly, with a colour chip.
- Size Chart — upload an
.xlsxper Brand + Category. - Open the product on
/enand confirm the colour picker, size picker and Find your size guide.
Once your variant products look right on the storefront, continue to 10 · Bulk Product & Image Tools to populate a large catalogue quickly.