Set Up Payments (iVend Gateways)
Before shoppers can actually pay you, your store needs at least one payment gateway switched on. A gateway is the service that takes a customer's card details, charges the card and tells your store the money came through — for example Stripe.
In iVendNext, each payment method you accept is one iVend Gateway record. You create a record, point it at the settings that hold your account credentials, tick Enabled, and save. From that moment your store knows it may offer that method at checkout. Switch a gateway off and it stops being offered — no code, no re‑deploy.
This section shows you how to add and enable a gateway using Stripe as the worked example. The exact credential fields differ from one provider to another, but the create → point at settings → enable → save flow is always the same.
Where it lives: Open it from the Desk search bar (press Ctrl/Cmd + G), type iVend Gateway, and pick it from the list. There is no menu icon for payments — search is how you reach it. See 01 · Welcome & First Login for a refresher on the search bar.
Before you start (prerequisites)
- 08 · Add Your First Products — you need something to sell before a payment step means anything. Have at least one published product so you can test a real checkout later.
- 03 · Your eCommerce Settings Hub — your store's Company and currency should already be set here, so charges are taken in the right currency.
- You are logged in to the admin (Desk) as described in 01 · Welcome & First Login.
- An account with a payment provider (e.g. a Stripe account). You'll need the account's keys — your provider gives these to you in their dashboard, not here. Keep them handy but private.
Only iVend Gateway records count. This is the one and only place payments are turned on. Ignore any older Telr, Tabby or "Cash on Delivery" switches you might spot elsewhere in settings — they are legacy and are not part of this setup.
How enabling a gateway reaches checkout
You don't wire anything to the checkout page by hand. The storefront reads your enabled iVend Gateway records automatically — enable one and it becomes available to the payment step; disable it and it disappears.
flowchart LR
    A[Provider account<br/>e.g. Stripe] --> B[Gateway Settings<br/>your keys live here]
    B --> C[iVend Gateway record<br/>Enabled ✓]
    C --> D[Checkout<br/>offers the enabled method]
    D --> E[iVend Payment Request<br/>logs each transaction]
Every payment attempt is written to an iVend Payment Request record, so you always have a log of what was charged and whether it succeeded.
Step 1 · Open your payment gateways list
- Press Ctrl/Cmd + G to open the search bar.
- Type iVend Gateway and choose it from the results.
On a brand‑new store this list is empty — no payment method is switched on yet, which is exactly what you'd expect before you set one up.
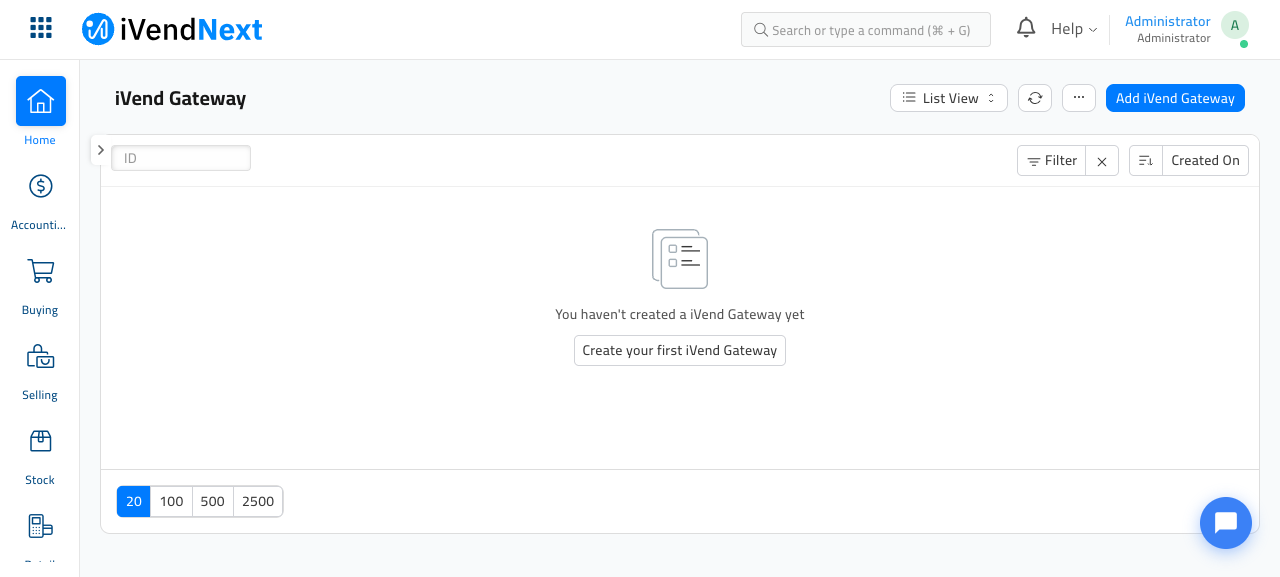
How you know it worked: you see the iVend Gateway heading and a blue Add iVend Gateway button at the top right.
Step 2 · Start a new gateway
Click the blue Add iVend Gateway button (or the Create your first iVend Gateway button in the middle of the empty list). A blank gateway form opens.
Fill in these fields:
- Name — type a short label for this payment method, e.g.
Stripe. This is just how you'll recognise it in the list. - Gateway Settings — this is where the actual account keys are stored. Click the field and select Stripe Settings (it ships with the app, so it's already there) — you'll fill in its keys during Step 3.
- Tick Enabled? so this method will be offered at checkout. (You can leave it un‑ticked for now and switch it on later once your keys are in.)
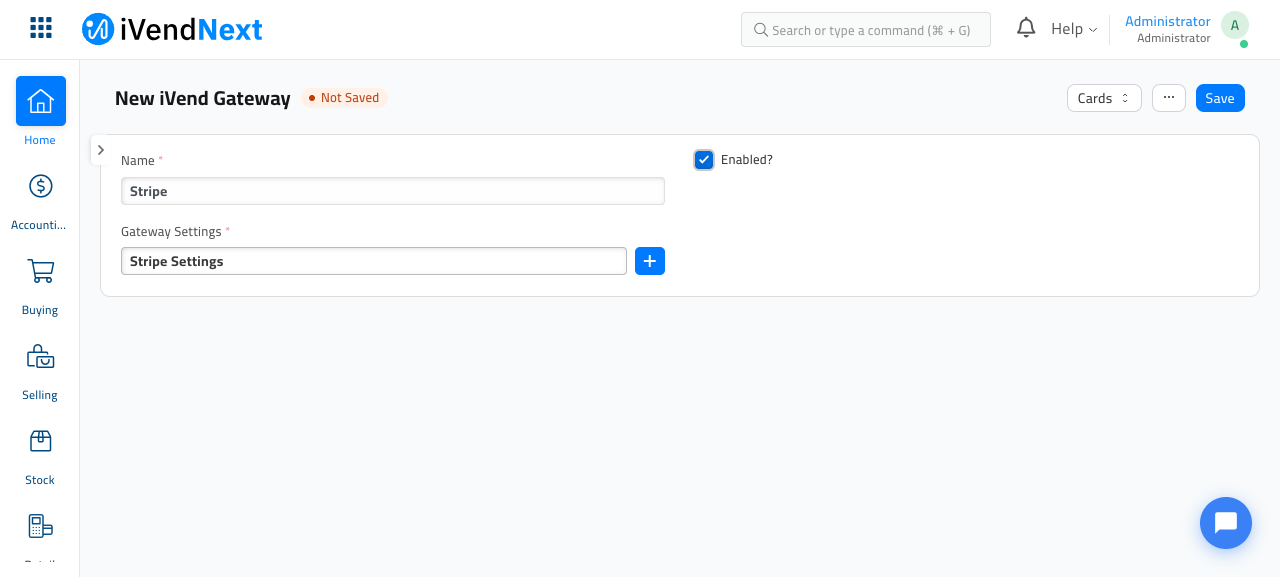
How you know it worked: the page title reads New iVend Gateway with an orange Not Saved marker, and both the Name and Gateway Settings fields are filled in.
Step 3 · Enter your provider's account keys
The gateway record itself is just a switch — your real account credentials live in the Gateway Settings it points to. Open that settings record (press Ctrl/Cmd + G and search for Stripe Settings) and fill it in with the keys from your provider dashboard.
For Stripe, you'll see:
- Enabled — tick this on.
- Mode — choose Test while you're trying things out, and switch to Live only when you're ready to take real money.
- Public Key and Private Key — paste the two keys Stripe gives you in your Stripe dashboard. The private key is hidden as dots for safety.
- Webhook Secret (optional but recommended) — the signing secret from your Stripe webhook, so Stripe can confirm payments back to your store.
- Success URL / Failure URL — where a shopper is sent after paying or after a failed attempt.
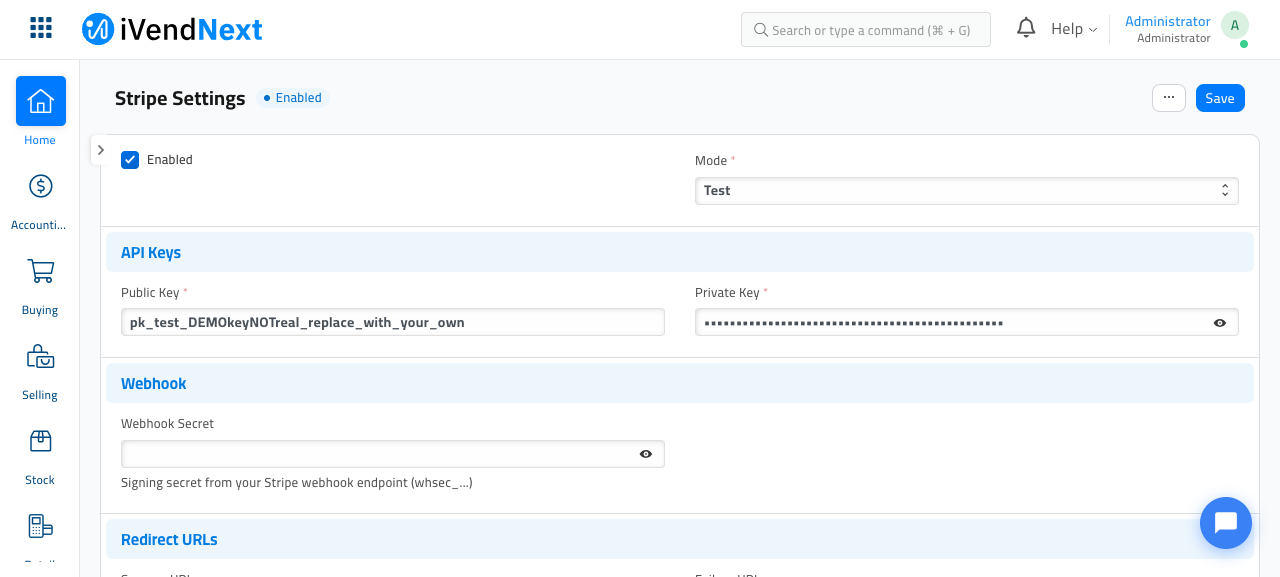
Keep your keys private. Your private key and webhook secret are like passwords for your bank account — never share them, screenshot them or paste them into chat. The screenshot above uses a placeholder public key and a masked private key on purpose.
Click Save on the settings form when the keys are in.
How you know it worked: a green Saved message flashes and the status pill next to the title reads Enabled.
Step 4 · Save the gateway
Go back to your iVend Gateway record and click the blue Save button at the top right (or press Ctrl/Cmd + S).
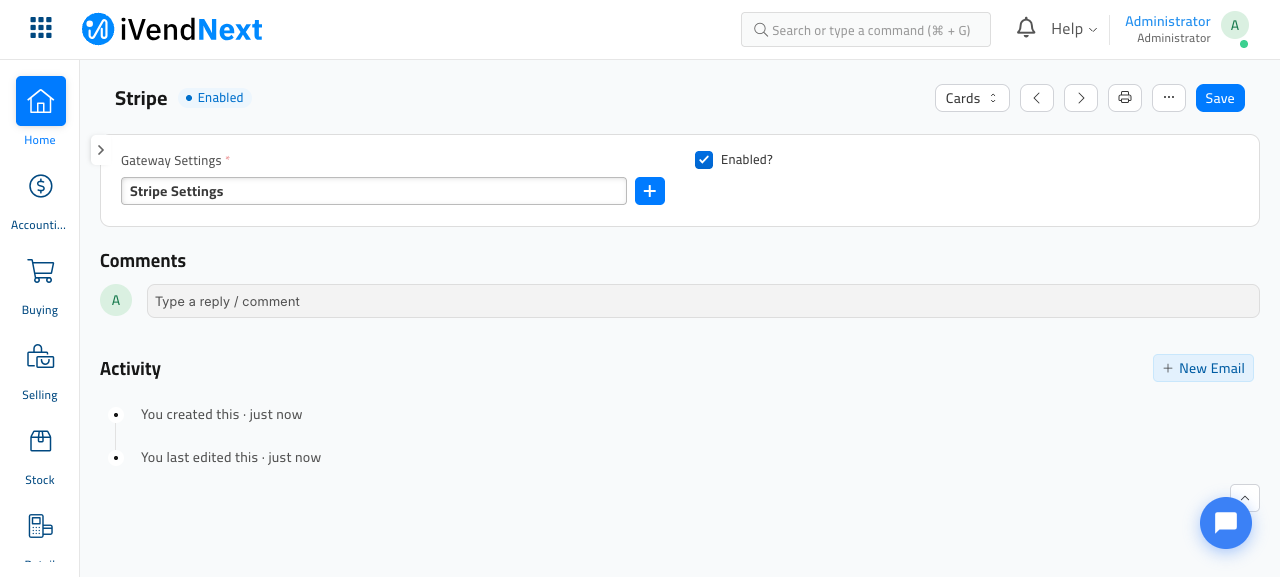
How you know it worked: the orange Not Saved marker is replaced by a blue Enabled status next to the title, and an activity note reads You created this.
Step 5 · Confirm it in the list
Search for iVend Gateway again to return to the list. Your new gateway now appears as a row.
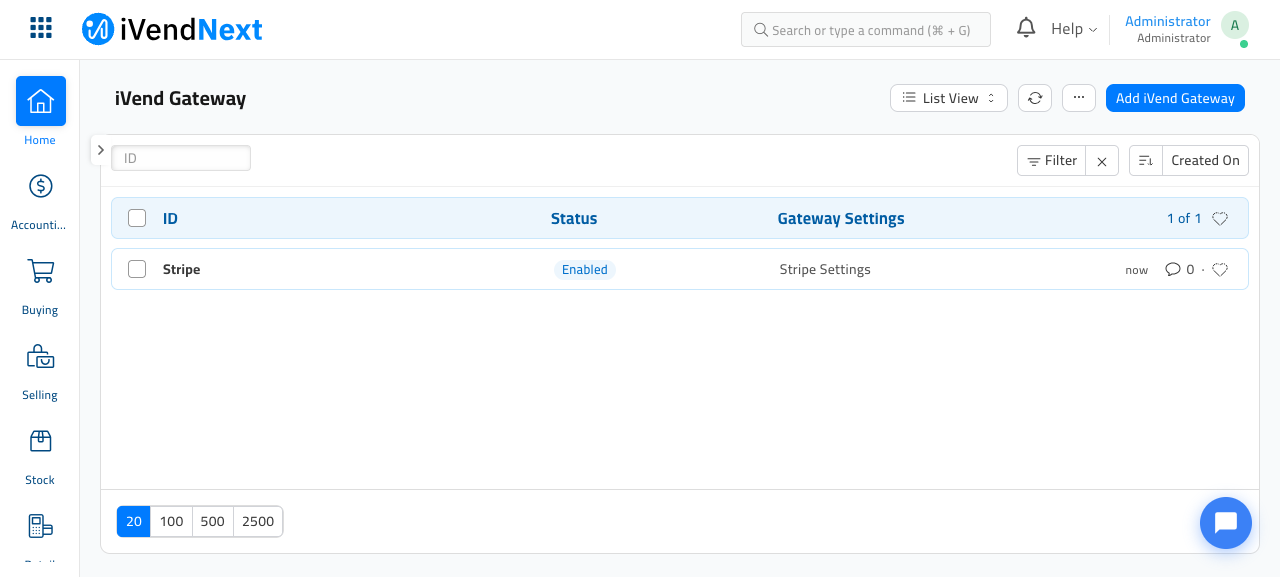
How you know it worked: the row shows your gateway's Name (Stripe), a blue Enabled status, and the Gateway Settings it uses. Your store will now offer this payment method at checkout.
To turn a method off later, open its iVend Gateway record, un‑tick Enabled? and save — or open the row's Gateway Settings and un‑tick Enabled there. Either way it stops being offered at checkout. To accept more than one method, repeat Steps 2–4 for each provider; every enabled record is offered.
Step 6 · See what your shopper pays with
With Stripe enabled, a shopper who fills in their delivery and billing details at checkout picks Stripe as their payment method and clicks Place order. Your store hands them over to Stripe's own secure payment page to enter their card — you never handle or store card numbers yourself.
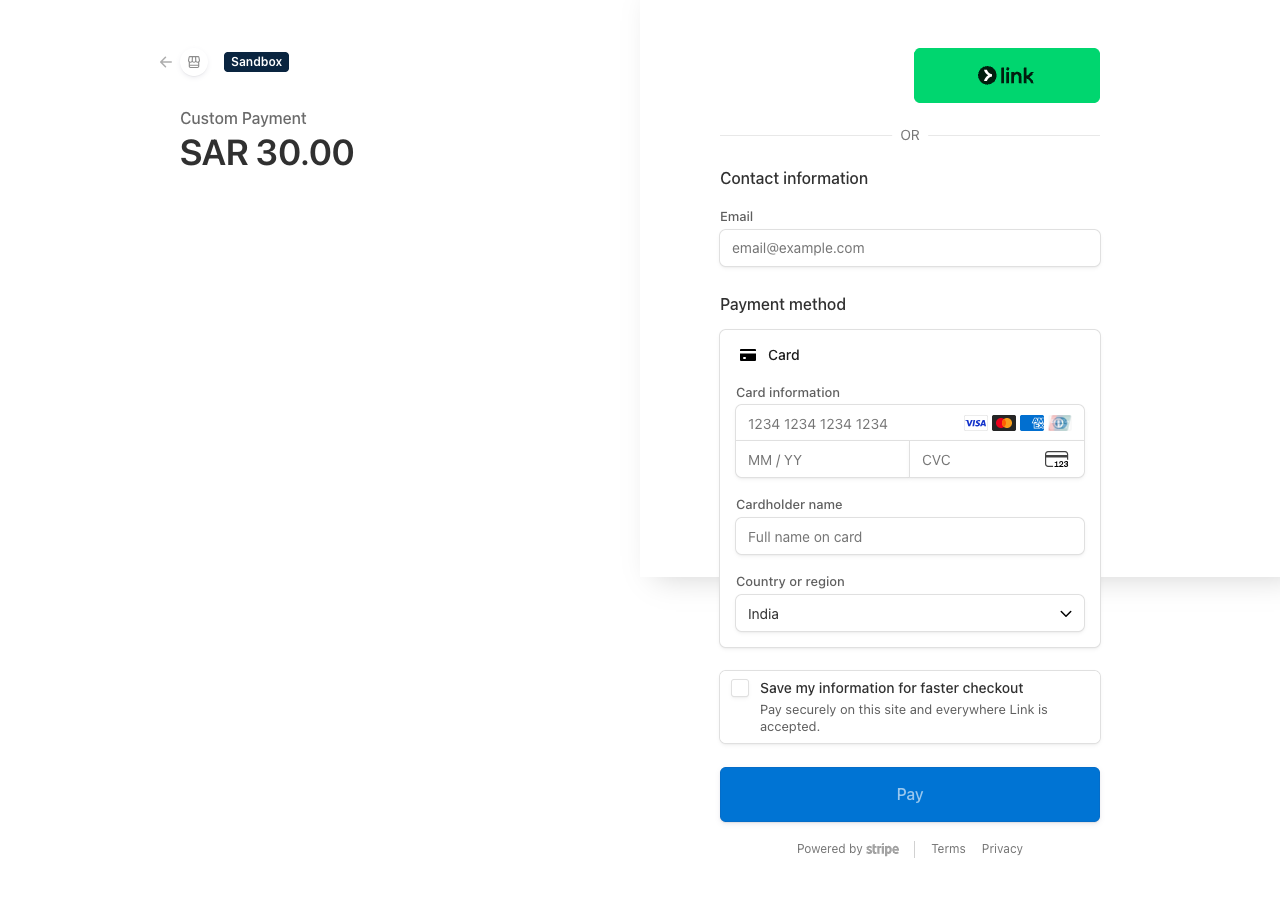
How you know it worked: after clicking Place order, the shopper lands on a page headed with your order amount and a card details form, with Powered by stripe at the bottom. When the payment goes through, they're returned to your store's order confirmation. (In Test mode this page is marked Sandbox and no real money moves — perfect for a trial run before you switch to Live.)
One‑time technical setup (ask your administrator)
The storefront checkout page is part of your active theme, and its payment step needs to be wired up to display your enabled gateways to shoppers. On a freshly installed store the checkout template ships pointing at a default provider and may not yet show your enabled iVend Gateway records until your developer configures the theme's checkout for the gateways you actually use.
This is a developer task, not an owner setting — there is no button for it here. Before you go live, ask your administrator to confirm that the payment step at
/en/cart/checkoutoffers exactly the gateways you enabled above and nothing you don't accept. You (the owner) still control which gateways are on via the steps above; this callout is only about the storefront wiring behind them.
Where this fits in going live
Payments are one of the three "can I actually take an order?" pieces. A store isn't sellable until all three are in place:
flowchart TD
    P[08 · Products<br/>at least one published] --> READY{Ready to<br/>take orders?}
    PAY[11 · Payments<br/>a gateway Enabled ✓] --> READY
    SHIP[12 · Shipping & tax<br/>rule + price list wired] --> READY
    READY --> GO[17 · Preview & Go Live<br/>test a real checkout]
With a gateway enabled, set up how much you charge to deliver and any taxes in 12 · Shipping, Taxes & Pricing, then run through a real test order at 17 · Preview & Go Live.
Quick recap
- Search for iVend Gateway (Ctrl/Cmd + G) and click Add iVend Gateway.
- Give it a Name (e.g. Stripe), point Gateway Settings at the matching settings record, and tick Enabled?.
- Open the Gateway Settings and paste in your provider's keys — keep Test mode on until you're ready.
- Save the gateway; its status shows Enabled.
- Confirm the row appears Enabled in the list — repeat for each method you accept.
- Ask your administrator to confirm the storefront checkout offers your enabled gateways before you go live.