Configure Your Home Page
Your home page is the first thing shoppers see. Instead of an empty default, you'll fill it with a rotating hero banner, a scrolling announcement bar (marquee), shop‑by‑category and shop‑by‑brand rows, and a "Shop the Look" set of feature banners.
All of this is edited on one screen: your active theme's own settings page. Because the theme activated in this guide is Home Fashion 01, that page is called Home Fashion 01 Settings. If you activate a different theme, the page name changes to match (for example Home Grocery Settings), but the idea is the same. Themes that don't ship their own settings page fall back to a shared page called Landing Page Settings — the sections you edit there work the same way.
Where it lives: Open it from the Desk search bar (press Ctrl/Cmd + G), type Home Fashion 01 Settings, and pick it from the list. There is no menu icon for it — search is how you reach it. See 01 · Welcome & First Login for a refresher on the search bar.
Before you start (prerequisites)
Complete these first:
- 04 · Choose & Activate Your Theme — a theme must be active before this page has any effect. The home‑page content you enter here is only shown by the active theme's home template. If no theme is active, nothing you set here appears on the storefront.
- 03 · Your eCommerce Settings Hub — your store name, logo, and company should already be set. The home page inherits those.
- You are logged in to the admin (Desk) as described in 01 · Welcome & First Login.
One‑time technical setup — ask your administrator
This is not a shop‑owner step. Each theme's home page is drawn by template files that ship with the app and are installed once by whoever sets up your store. If those files (or the theme's Home Fashion 01 Settings page) aren't present on your site yet, the sections below either won't appear in Desk or won't render on the storefront — even though you've filled them in. If that happens, ask your administrator to confirm the theme is installed and activated (see 04 · Choose & Activate Your Theme) before you spend time configuring the home page.
How the home page fits together
Everything on the home page is a section on the settings page. You fill in a section (some are simple fields, some are small tables you add rows to), click Save, and it appears in the matching band on the live storefront.
flowchart LR
    subgraph settings["Home Fashion 01 Settings (this page)"]
        H[Hero Banner table]
        L[Shop the Look banners]
        C[Shop by Category]
        B[Shop by Brand]
        M[Marquee messages]
    end
    STORE["Your live home page (/en)"]

    H --> STORE
    L --> STORE
    C --> STORE
    B --> STORE
    M --> STORE
Colors are not set here. Fonts and colors live on a different screen (Lifestyle Settings → Color Scheme) and are outside this guide — leave them on their defaults.
Step 1 · Open the settings page
- Press Ctrl/Cmd + G to open the search bar.
- Type Home Fashion 01 Settings and choose it from the list.
How you know it worked: the page title reads Home Fashion 01 Settings, and you see a Homepage tab with sections labelled Hero Slider, Shop the Look, Shop by Category, Shop by Brand, and Marquee.
Step 2 · Build the hero slider
The hero slider is the large rotating banner at the very top of the home page. Each row you add is one slide.
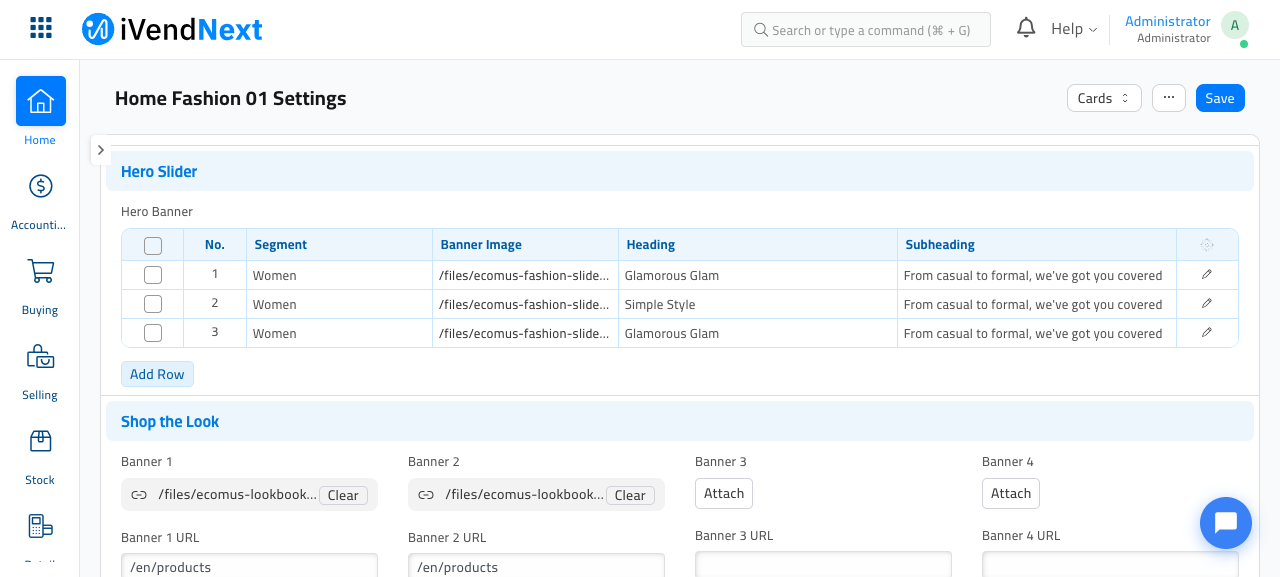
- In the Hero Slider section, click Add Row under the Hero Banner table. A new empty row appears. (The screenshot above shows the table already filled with three example rows — on your fresh store it will be empty until you add the first one.)
- Click the row (or the pencil icon at its right end) to open it for editing. The row expands into a small form:
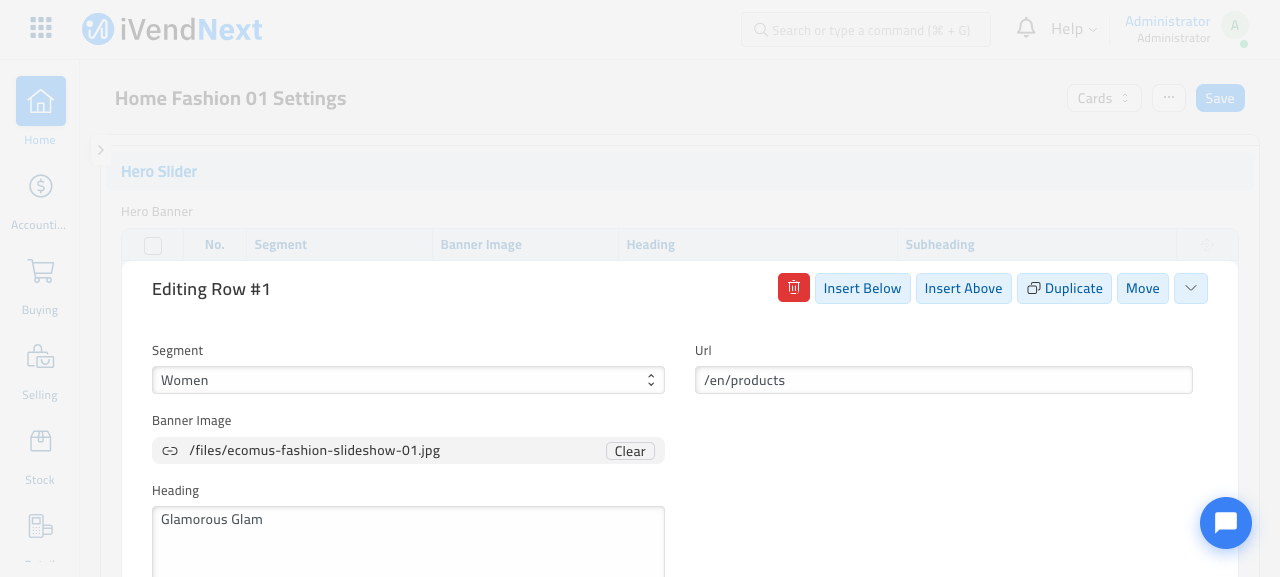
- Fill in the fields:
- Segment — choose Women, Men, or Kids. This tags the slide for that department.
- Banner Image — click Attach and upload a wide, high‑quality photo. This is the picture shoppers see, so use your best images.
- Url — where the slide links to when clicked, for example
/en/products(all products) or a category page. - Heading — the large headline text on the slide, e.g. Glamorous Glam.
- Subheading — the smaller line beneath it, e.g. From casual to formal, we've got you covered.
- CTA — the button text, e.g. Shop collection.
- Repeat Add Row for each slide you want in the rotation (three is a good start).
How you know it worked: each slide shows as a row in the Hero Banner table with its segment, image name, and heading filled in.
Tip: keep headings short and use images of the same shape (all landscape, similar size) so the slider looks even as it rotates.
Step 3 · Set the "Shop the Look" banners
Just below the hero is Shop the Look — up to four feature banners (great for a lookbook, a sale, or a seasonal edit).
For each of Banner 1 to Banner 4 (see the lower part of the first screenshot):
- Banner n — click Attach and upload the banner image.
- Banner n URL — type where it should link, e.g.
/en/products.
You don't have to use all four — fill in as many as you want and leave the rest empty.
How you know it worked: a thumbnail of each uploaded image replaces its Attach button, and the URL text stays in its box.
Step 4 · Choose your "Shop by Category" row
This section shows clickable category tiles so shoppers can jump straight to a department.
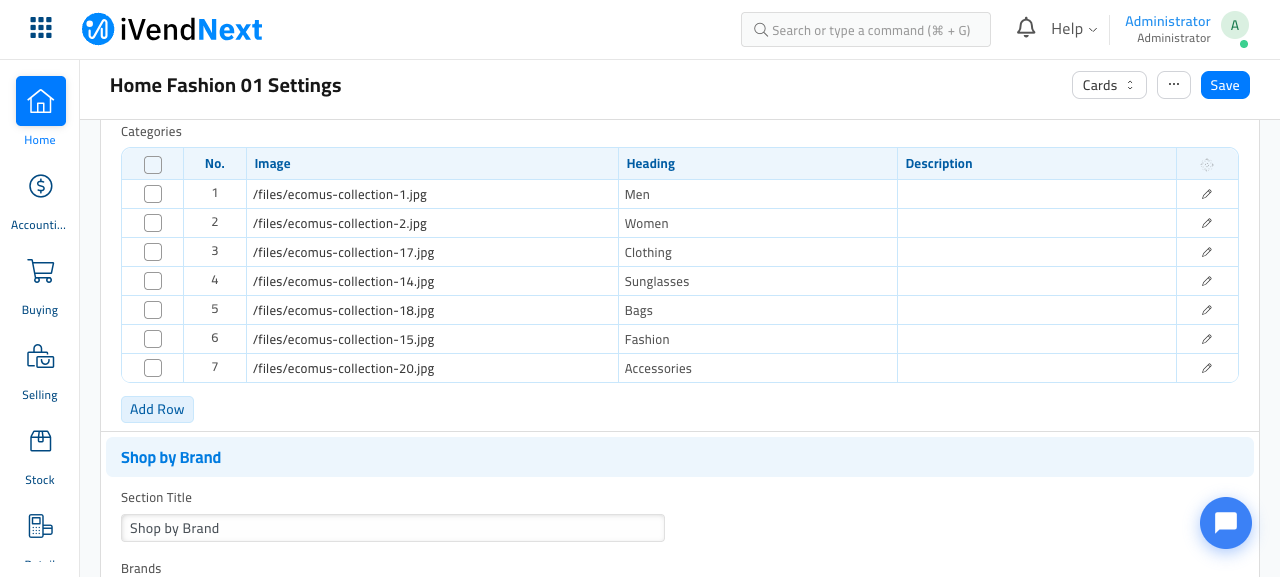
- Section Title — the heading shown above the tiles, e.g. Shop by Categories.
- Under Categories, click Add Row for each tile, then fill in:
- Image — the picture for the tile (click Attach).
- Heading — the label under the tile, e.g. Women or Bags.
- Description — optional short text.
How you know it worked: each category shows as a row with its image and heading.
These tiles are just pictures and labels you pick here. The actual browsable category tree — the menu shoppers filter by — is set up separately in 07 · Organize Your Catalog.
Step 5 · Choose your "Shop by Brand" row
Directly below is Shop by Brand, which works exactly like Shop by Category but for brand logos.
- Section Title — e.g. Shop by Brand.
- Under Brands, click Add Row for each logo and attach the brand image. Add a heading if you'd like a label.
How you know it worked: each brand logo shows as a row in the table.
Step 6 · Write your marquee (scrolling announcement bar)
The marquee is the thin strip of scrolling messages (e.g. Free shipping over $120) that keeps moving across the page. Each row is one message.
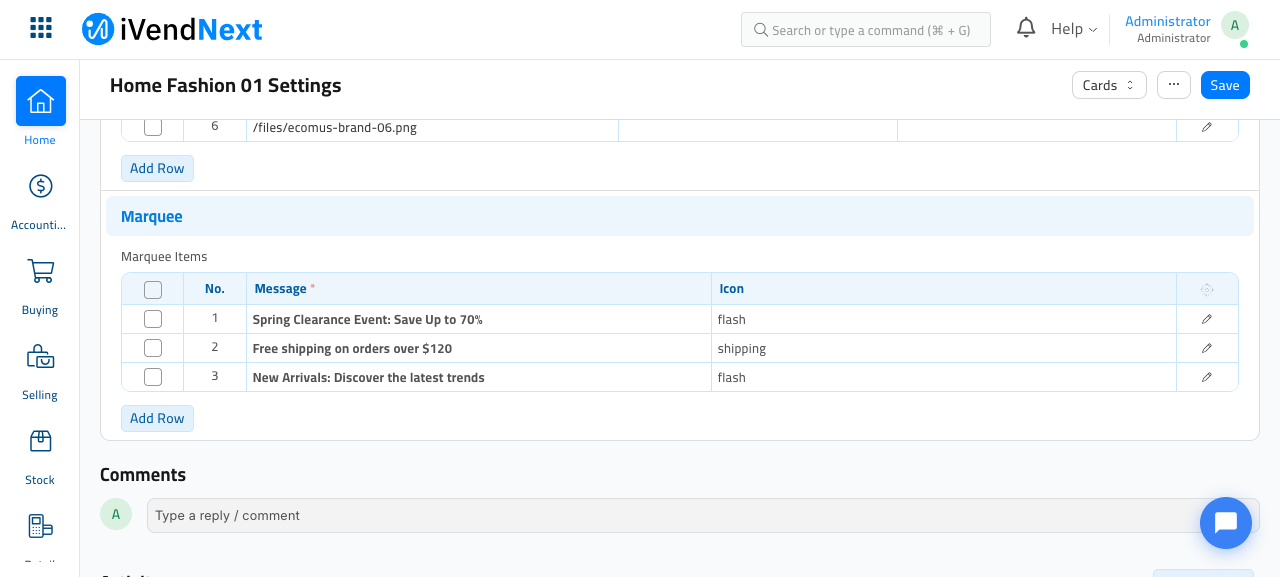
- Under Marquee Items, click Add Row.
- Fill in:
- Message — the text to scroll, e.g. Free shipping on orders over $120.
- Icon — pick a small icon to sit beside the message from the list (for example
shipping,return,gift,star,payment).
- Add a few rows — they scroll one after another.
How you know it worked: each message shows as a row with its text and icon name.
Step 7 · Save
Click the blue Save button at the top right of the page (or press Ctrl/Cmd + S).
How you know it worked: a green Saved message flashes at the top, and the unsaved‑changes dot next to the page title disappears.
Step 8 · (Optional) Set the store‑wide announcement strip
Separate from the theme's marquee, there is a single store‑wide announcement banner — one short message with an optional link, shown across the top of every page (not just the home page). It's handy for a headline promotion or a shipping notice.
You edit it on the hub, not here: open Lifestyle Settings → Banners tab. The full walkthrough is in 13 · Discounts, Coupons & Promotions.
Step 9 · Preview your home page
-
Open a new browser tab and go to your storefront home page at
/en(for examplehttp://your‑store/en). -
Scroll down the page, in order, checking off each band you configured:
- the hero slider at the very top,
- the marquee strip,
- the Shop the Look banners,
- the Shop by Category row, then the Shop by Brand row.
Keep scrolling and, below all of those, you reach the product carousel drawn from your catalog (shown below). This is not set on this settings page — it comes from your catalog and is covered in 07 · Organize Your Catalog — but it confirms you've scrolled to the bottom of a working home page.
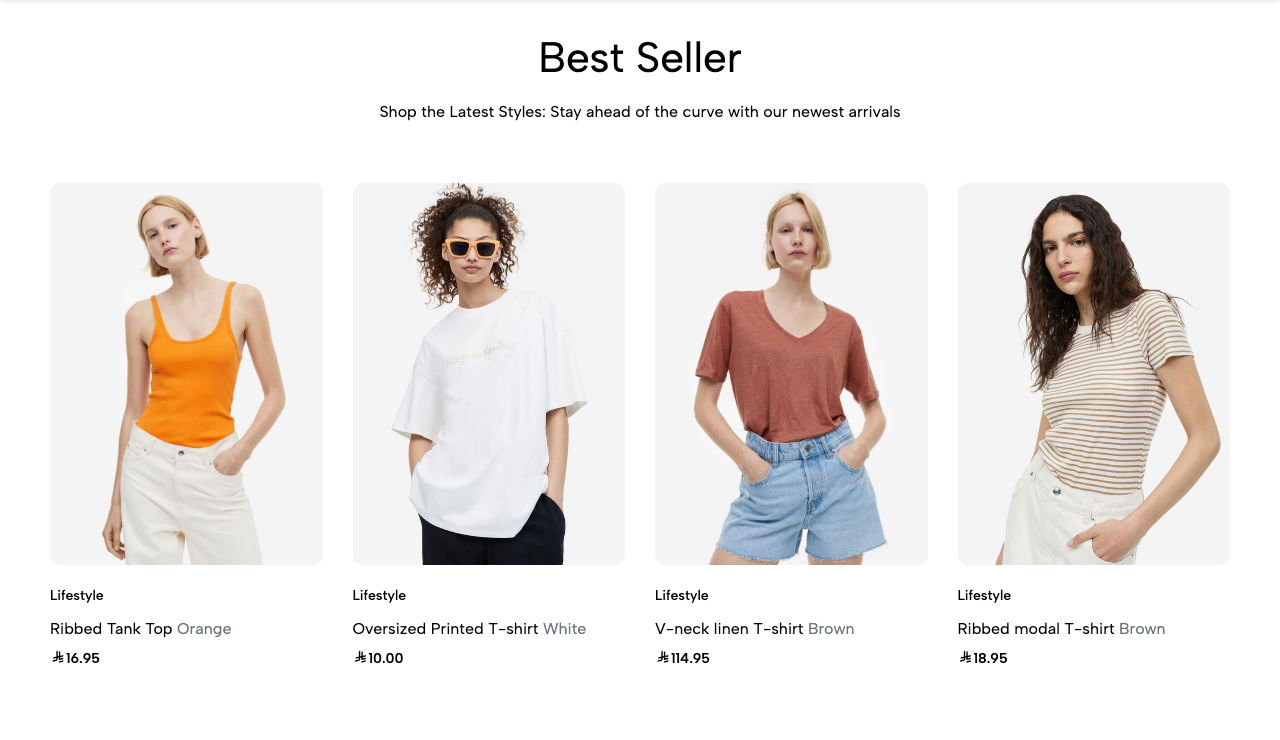
How you know it worked: the sections you filled in on the settings page appear as bands down the home page. If a section is empty on the storefront, go back to the settings page, confirm that section has rows and is Saved, and reload /en.
If the whole page still looks like the plain default with no hero, the most common cause is that no theme is active — return to 04 · Choose & Activate Your Theme and confirm your theme's Active box is ticked and saved.
Where this fits in the bigger picture
flowchart TD
A[04 · Activate a theme] --> B[05 · Fill the theme's<br/>Home Fashion 01 Settings]
B --> C[Hero, marquee, category<br/>& brand rows appear on /en]
C --> D[06 · Footer, navigation<br/>& store info pages]
D --> E[17 · Preview & Go Live]
With your home page populated, move on to 06 · Footer, Navigation & Store Info Pages to finish the top and bottom of every page.