Your eCommerce Settings Hub (Lifestyle Settings)
This is the single most important screen in your store. Lifestyle Settings is the one control panel that holds almost every store‑wide setting: your store name and logos, the company money flows through, your price lists and warehouse, shipping, returns, contact details, social links, SEO, banners, and footer.
You will come back to this page again and again. In this section you will get oriented and set the branding and company basics that everything else builds on. Later sections drill into the individual tabs (home page, footer, payments, shipping, SEO, returns), so don't try to fill in everything at once here.
Where it lives: Open it from the Desk search bar (press Ctrl/Cmd + G), type Lifestyle Settings, and pick it from the list. There is no menu icon for it — search is how you reach it. See 01 · Welcome & First Login for a refresher on using the search bar.
Before you start (prerequisites)
Complete these first:
- 02 · Store Foundations — your Company and currency must already exist in the system. Lifestyle Settings links to a Company you created there; it does not create one.
- You are logged in to the admin (Desk) as described in 01 · Welcome & First Login.
A few values on this page are created elsewhere first and then simply selected here. The pattern across the whole store is:
flowchart LR
    subgraph erp["Created in the system first"]
        C[Company]
        CG[Customer Group]
        PL[Price Lists]
        WH[Warehouse]
        SR[Shipping Rule]
    end
    subgraph hub["Lifestyle Settings (this page)"]
        H[You SELECT them here]
    end
    STORE[Your live storefront & checkout]

    C --> H
    CG --> H
    PL --> H
    WH --> H
    SR --> H
    H --> STORE
So if a dropdown on this page is empty, the fix is usually to create that record first (Company, Price List, Warehouse, Shipping Rule) and then come back and select it.
How the tabs are organized
Along the top of Lifestyle Settings is a row of tabs. Each tab is a themed group of settings. Here is the map so you know what lives where — most tabs get their own dedicated section later in this guide.
| Tab | What it controls | Covered in |
|---|---|---|
| Details | Store name, logos, favicon, company, customer group, price lists, warehouse, shipping | This section (basics) + 12 · Shipping, Taxes & Pricing |
| Bulk Actions / Import | Demo data, publish‑all‑items, variant tools | 10 · Bulk Product & Image Tools |
| Contact Information | Phone, email, hours, address, map link | 06 · Footer, Navigation & Store Info |
| Social Media | Facebook, Instagram, TikTok, etc. | 06 · Footer, Navigation & Store Info |
| SEO | Page titles, share images, sitemap, AI crawlers | 14 · SEO & Social Sharing |
| Banners | Top announcement bar messages | 13 · Discounts, Coupons & Promotions |
| Footer Customization | Footer columns, newsletter block, copyright | 06 · Footer, Navigation & Store Info |
| Policies | Shipping & return policy text | 16 · Orders, Fulfillment & Returns |
| Communication | Order confirmation / cancellation emails | 16 · Orders, Fulfillment & Returns |
The Color Scheme tab also exists but is not covered in this guide — leave it on its defaults.
Step 1 · Set your store name
The store name appears in the browser tab and as your site title.
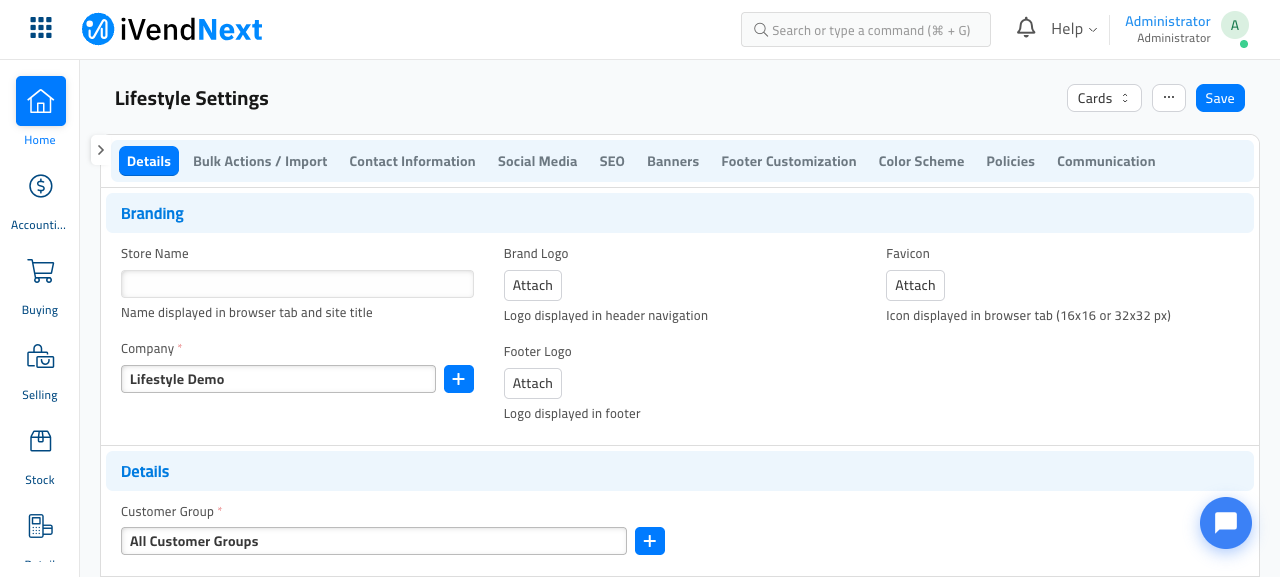
- Make sure you are on the Details tab (it opens there by default).
- In the Branding section, click the Store Name box and type your store's name, for example Lifestyle Fashion.
How you know it worked: the text stays in the box, and a small unsaved‑changes dot appears near the page title. You will save everything together in Step 6.
Step 2 · Add your logo and favicon
Still in the Branding section (see the screenshot above):
- Brand Logo — click Attach and upload the logo for your header (the top of every storefront page). A wide, transparent PNG works best.
- Footer Logo — click Attach and upload the logo for the bottom of the page (this can be the same file or a lighter version).
- Favicon — click Attach and upload a small square icon (16×16 or 32×32 pixels). This is the tiny icon shown in the browser tab.
How you know it worked: after each upload, a thumbnail preview appears in place of the Attach button.
Tip: you don't have to set all three now. You can upload a logo today and add the favicon later — just save when you're done.
Step 3 · Link your Company
The Company tells the store which business the orders, prices, and currency belong to. This field is required — you can't save without it.
- In the Branding section, click the Company box.
- Choose the Company you set up in 02 · Store Foundations.
How you know it worked: the company name shows in the box. If the dropdown is empty, you haven't created a Company yet — go back to section 02 first.
Step 4 · Choose your Customer Group
Just below, in the Details section, is Customer Group — the group new online shoppers are filed under. This field is also required.
- Click the Customer Group box.
- Pick a group. All Customer Groups is a safe default if you're unsure.
How you know it worked: the group name shows in the box.
Step 5 · Wire up price lists, warehouse and shipping
Scroll down the Details tab. Here you connect the pricing, stock, and delivery records to your store. These are all things you create elsewhere and simply select here (see the diagram at the top).
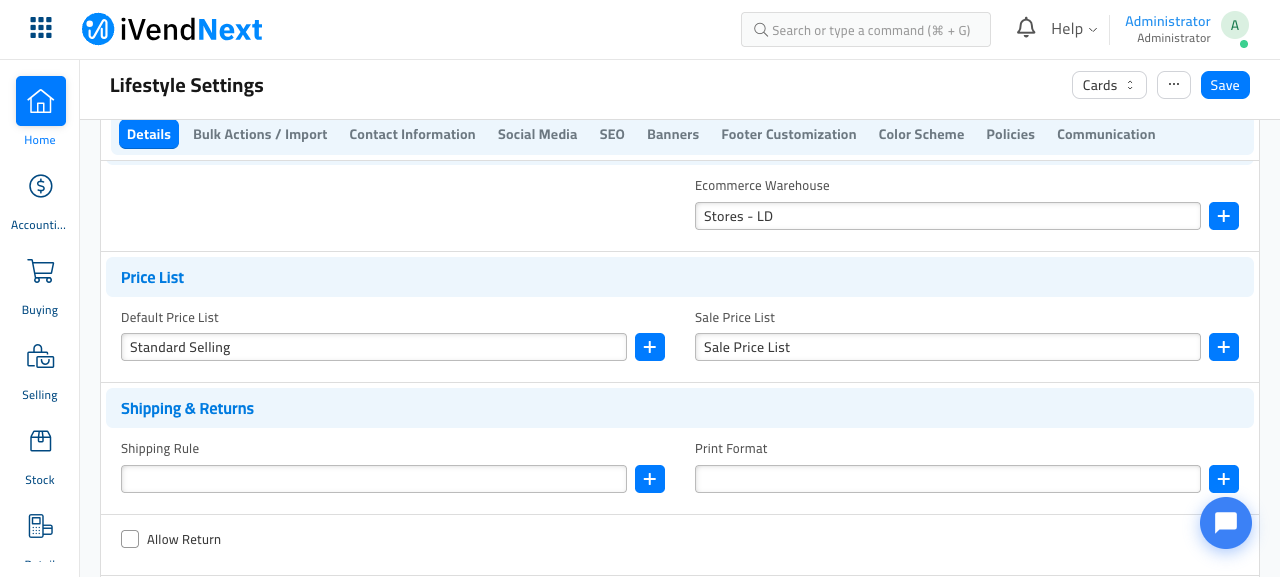
- Ecommerce Warehouse — the warehouse stock levels are checked against, so "in stock / out of stock" is accurate on the storefront.
- Default Price List — the price list shoppers normally see (for example Standard Selling).
- Sale Price List — an optional second list for discounted / sale prices.
- Shipping Rule — the delivery‑charge rule applied at checkout. You can leave this empty for now and set it in 12 · Shipping, Taxes & Pricing.
The full detail of price lists, warehouses, and shipping rules lives in 12 · Shipping, Taxes & Pricing. For now, just make sure a Default Price List and an Ecommerce Warehouse are selected so prices and stock show correctly.
Step 6 · Save
Click the blue Save button at the top right of the page (or press Ctrl/Cmd + S).
How you know it worked: a green Saved message flashes at the top, and the unsaved‑changes dot next to the page title disappears.
If Save is blocked: the system may tell you a required field is missing. Lifestyle Settings requires Company, Customer Group, and three email templates on the Communication tab (Order Confirmation, Order Cancellation, Item In Stock). If those email templates aren't set yet, open the Communication tab and choose them — or run Install Demo Data (below), which fills them in for you.
Two handy action buttons (Bulk Actions / Import tab)
Open the Bulk Actions / Import tab. Near the bottom, under Demo Data & Testing, are two buttons you'll use while setting up.
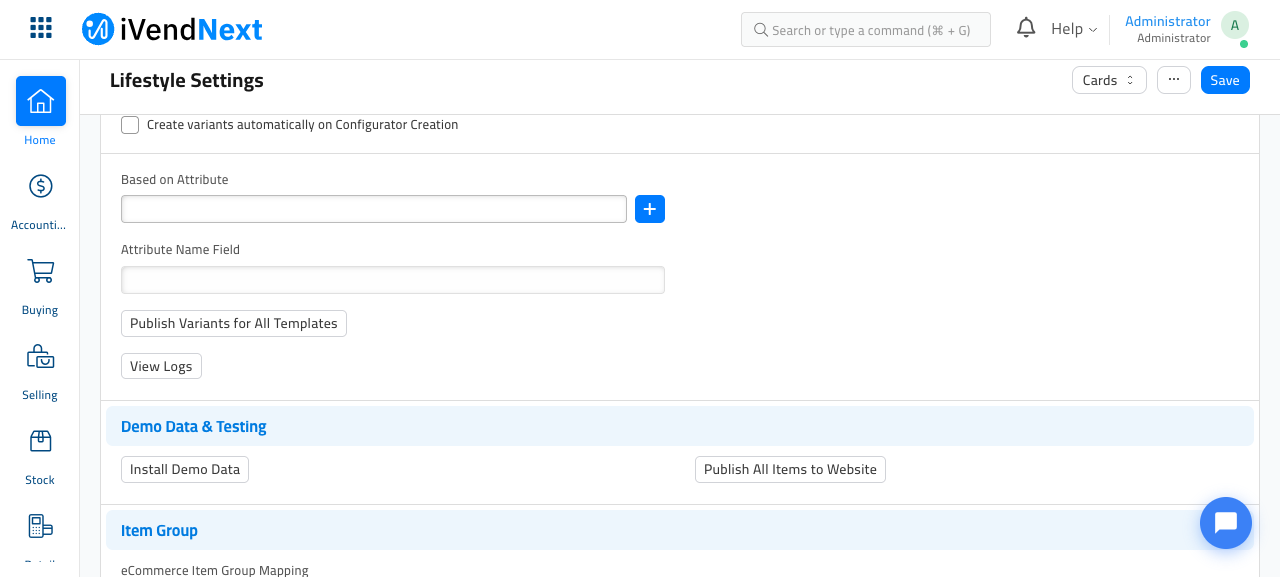
- Install Demo Data — seeds a ready‑made starter set: product attributes, brands, price lists, a shipping rule, a warehouse, sample products, and the required email templates, and fills in Lifestyle Settings for you. Great for exploring the store before you add your own catalog. It does not create or activate a theme — you still do that in 04 · Choose & Activate Your Theme.
- Publish All Items to Website — makes every eligible product visible on the storefront in one click. You'll use this again at go‑live in 17 · Preview & Go Live.
About payment methods
You do not set up payment methods on this page. In this store, checkout payment options come from a separate payment gateway app and are configured in 11 · Set Up Payments. When you get there, checkout will offer the payment gateways you've enabled.
If you don't yet see a way to manage payment gateways, it means the payment app hasn't been added to your site yet — ask your administrator (see the technical note below).
Where this fits in the bigger picture
Lifestyle Settings is the plumbing every later section relies on. Here's the order things generally happen, and where this hub sits:
flowchart TD
A[02 · Company & currency exist] --> B[03 · Lifestyle Settings<br/>brand name, logo, company,<br/>price list, warehouse]
B --> C[04 · Activate a theme]
C --> D[05–06 · Home page, footer, contact]
B --> E[07–10 · Build the catalog]
B --> F[11–12 · Payments, shipping, pricing]
D --> G[17 · Preview & Go Live]
E --> G
F --> G
Once your branding and company basics are saved here, move on to 04 · Choose & Activate Your Theme to give your storefront its look.
One‑time technical setup — ask your administrator
These are not shop‑owner steps; they're done once by whoever installs the store:
- Payment gateways are provided by a separate payment app (
ivend_payment). If it isn't installed on your site, the iVend Gateway records that drive checkout won't exist and section 11 can't be completed. Ask your administrator to install and configure it.- The Lifestyle Settings page itself and its required email templates are created automatically when the app is installed. If Save complains about missing email templates and Install Demo Data isn't appropriate for your live site, ask your administrator to create the Order Confirmation, Order Cancellation, and Item In Stock email templates.